
Nut/OS on the AT91SAM7X256 EK
This document describes, how to install, configure and build Nut/OS for the AT91SAM7X256 on a Windows PC.
At the time of this writing, the Nut/OS kernel runs on the AT91SAM7X256 evaluation kit, but Nut/Net doesn't. Due to an unknown bug, the Ethernet driver fails to transmit packets. Any help is welcome.
Requirements
In the first place we need the target board. We are using Atmel's AT91SAM7X(C)256 evaluation kit here.
Software development can be done on a Windows or Linux PCs. However, at the time of this writing, only Windows had been fully tested for this CPU.
If you haven't installed Nut/OS yet, follow the instructions on this page:
Installing Nut/OS on Windows.
In case you still want to try Linux, read
Nut/OS Development on Debian.
This will be helpful, even if using other Linux/UNIX distributions
The SAM7X MCU contains a bootloader (called SAM-BA) in internal ROM. Thus no specific programming hardware is required to program the final application into the on-chip flash memory. However, we used the SAM-ICE JTAG adapter. You also need the related software. The most simple one that works with SAM-ICE is SAM-PROG, which can be downloaded free of charge from Atmel's Website.
Nut/OS Configuration
If you precisely followed the installation instructions, the Nut/OS Configurator will have been started already. At any later time you can start this tool via the Windows Start Menu.
Linux users, which are still with us, should enter nutconf on the shell prompt.
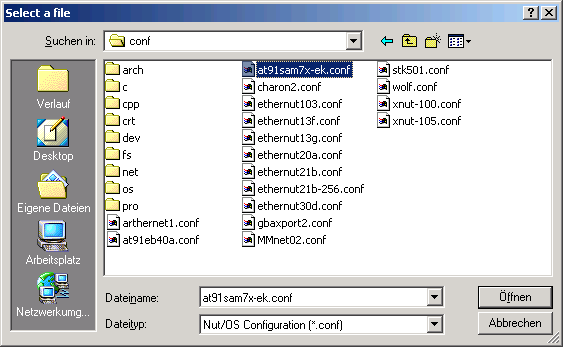
The Configurator first presents a file selection dialog, from which you can choose a pre-configuration for a specific board. We use the one for the AT91SAM7X-EK.
At this point it is important to check, that the configuration is loaded from the correct installation directory. The default for Nut/OS 4.2.1 is
c:\ethernut-4.2.1\nut\conf\Due to an internal problem, the Configurator may provide a directory from a previous Nut/OS installation by default.

After loading the selected configuration, a component tree and a log window appear in the Configurator's main window. Check the log window to make sure, that the repository and the configuration file had been loaded from the current installation directory. If they are not correct, you may reload the configuration later. For now, just continue.
Nut/OS is configured in two steps. First some Configurator settings need to be specified. These settings are stored in the Windows repository. To change these settings, select Edit -> Settings... from the main menu.

A notebook with five pages appears. On the first page, titled Repository you can specify the path of the repository file. Remember the log in the main window? If the wrong repository had been loaded, you can correct this here.
Relative paths are allowed, but the Configurator is not as stable as it should be, so better enter a full absolute path. Always use Unix like slashes to separate directory paths, not Windows like backslashes.
Btw. the repository is a set of scripts, which lists all Nut/OS modules and their optional settings. You do not need to know anything about it unless you want to implement new drivers etc.
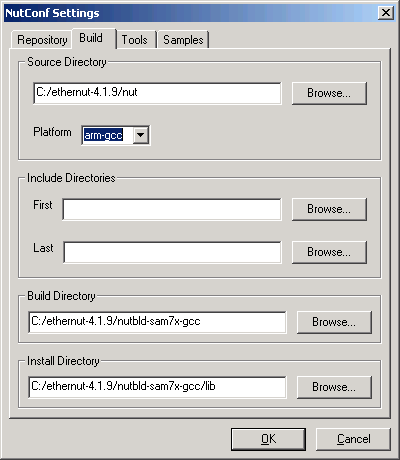
The settings on the second page specify the locations of the Nut/OS source code, header files, build directory and the final destination of the newly build libraries. It is recommended to stick with the defaults shown.
In any case make sure, that the Install Directory is located within the Build Directory.
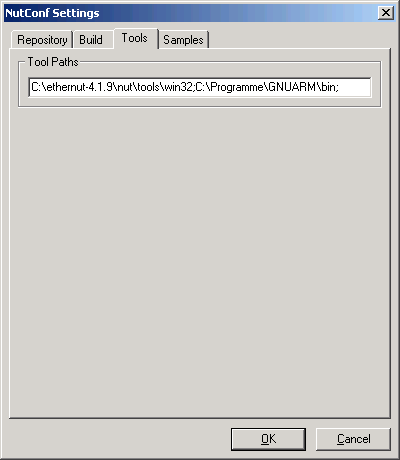
On the third page the build environment has to be specified. In contrary to the rule stated above, backslashes must be used. And, because of a minor issue in the Configurator, a semicolon must be appended. Furthermore it is important, that the Nut/OS tools directory comes first, followed by the path of the compiler.
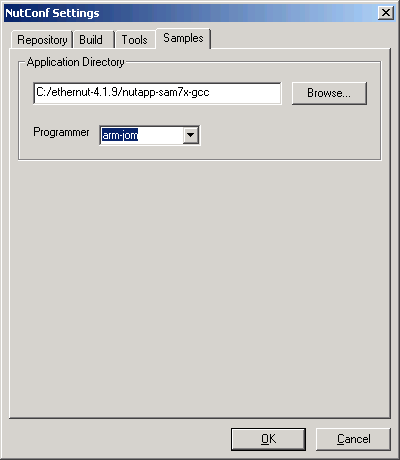
The last page provides a temporary solution to the currently not existing application wizard. The configurator will simply copy the Nut/OS samples to the directory specified on this page.
The programmer selection can be ignored. We will use SAM-PROG.
Click OK to confirm all settings and return to the main window.
Important:
If you changed any of the paths, specifically the one of the repository,
you should now re-load the configuration file by selecting
File -> Open in the main menu. This way the correct repository
will be loaded.
Building Nut/OS
Before starting the build, make sure, that the correct linker script at91sam7x256_rom and the correct MCU are selected.
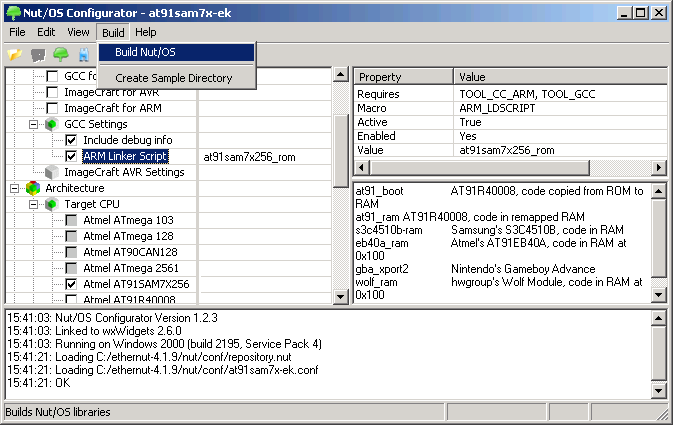
Start the build by selecting Build -> Build Nut/OS in the main menu or click on the tree symbol in the toolbar.

In a first step the build directory will be prepared. Check the displayed paths again and click OK.
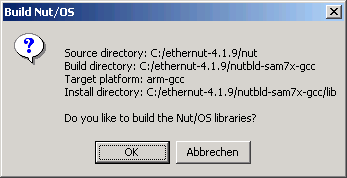
In a second step the Configurator will build the Nut/OS libraries. Click OK to start this build. It may take some time to finish.
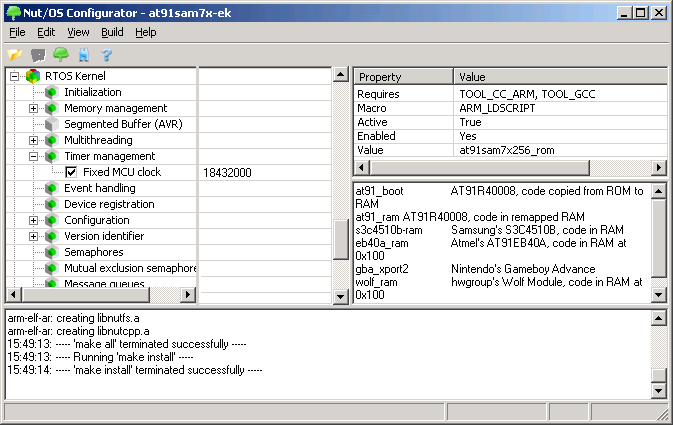
Check the output in the log window. make install should terminate successfully.
Building A Sample Application
Nut/OS comes with a number of sample applications. A quite simple one is called events, which demonstrates how to implement mutual exclusion with Nut/OS event queues.
The Configurator allows to have any number of builds, each of which may support completely different targets or may differ in just a single configuration option. Each build may have one or more associated application directories. The easiest way to create such a directory is to let the Configurator create one.

Selecting Build -> Create Sample Directory from the main menu will instruct the Configurator to copy the sample applications into a new or existing application directory and associate it to the current build tree.
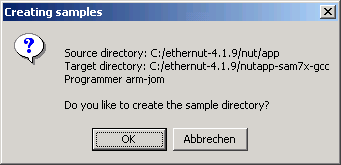
A confirmation dialog appears, which unfortunately doesn't clearly state the risk. If you already created this directory before and modified any of the samples, your changes will get lost. If unsure, click Abort and specify another application directory in the Configurator settings. Otherwise click OK.

Finally terminate the Configurator. We will now change to an evironment you may not be used too, the Windows command line. Don't worry, nothing really complicated going to happen.
Open a command line window, for example by executing cmd.exe from the Windows Start Menu.
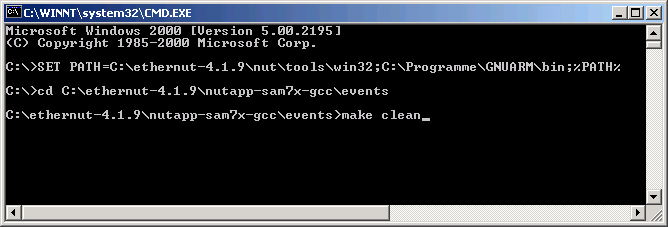
Expand the PATH environment, change to the directory that contains our events sample and clean-up any previous build by typing the follwing three commands.
SET PATH=C:\ethernut-4.2.1\nut\tools\win32;C:\Programme\GNUARM\bin;%PATH%
cd C:\ethernut-4.2.1\nutapp-sam7x-gcc\events
make clean

Now type
make installto build the application and link it to the associated Nut/OS build.
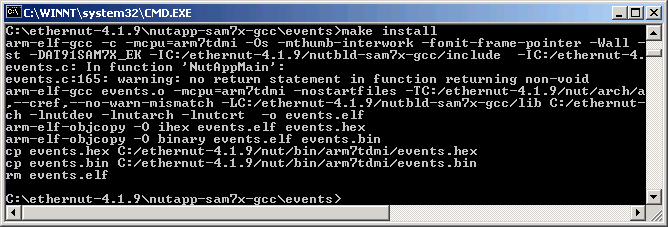
As a final result, two files will be created, which contain the binary code of our sample application. One is in Intel hex format (events.hex) while the second one is a pure binary image. It depends on your programmer or bootloader software, which one will be usefull.
Running The Sample Application
Please refer to Atmel's Website for a complete documentation about how to upload a binary to the AT91SAM7X256 target board. Make yourself familiar with the SAM-BA bootloader and how to enable or disable it. Be aware, that an application programmed into the MCU's flash memory will not run as long as the SAM-BA bootloader is enabled.
Connect the target board's serial port (not the DBGU port) with the PC via a serial cable. Start a terminal emulator like Hyperterm (Windows default) or TeraTerm (much more reliable). Serial port settings are 115200,8,n,1.
Connect your programmer hardware, if available, and power up the target board.
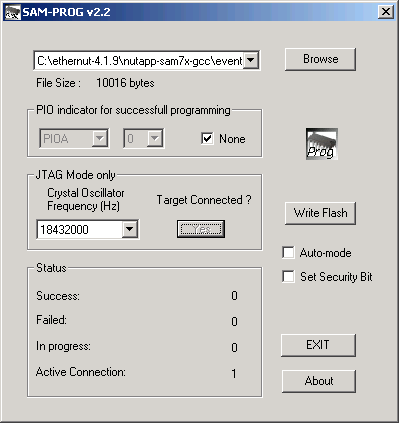
We will use SAM-PROG v2.2 with the SAM-ICE JTAG adapter, which is automatically detected. Click the Browse button and...

navigate with the file open dialog to the directory, where we build the events sample. Select the binary file events.bin.
Clicking Yes in the SAM-PROG window will establish a connection to the target board.

Finally click Write Flash to upload the selected binary to the target hardware.

Cycle the power of your target board. You should now see some output in the window of the terminal emulator's output window.
For some unknown reason, an application may not start immediately. Possibly there's something wrong with our hardware or, most probably, with the Nut/OS initialization of the SAM7X. In our environment it helps, to increase the power off duration of the target for at least 30 seconds.
Good luck,
Harald Kipp
Castrop-Rauxel, 4th of July 2006