
NPL Tutorial - Step 5
Using The XSVF Executor
The XSVF Executor is a Nut/OS applications, which uses the UROM file system to store, retrieve and execute a CPLD programming file. In fact the application doesn't have write access to the UROM file system, because it is read-only. Instead the files are included into the application code image when compiling and linking the project.
It is assumed, that you have downloaded and installed Nut/OS, build the libraries and created the sample application tree. Now download the XSVF Executor, unpack it and move the xsvfexec subdirectory into the application sample tree.
Next, move the file named npltut01.xsvf, which we created in a previous step, to the directory xsvfexec/cpld. Make sure its name is enut30d.xsvf.
Open a command line and change to the xsvfexec directory within the application tree. If not done already, add the Nut/OS tools directory and the GCC bin directory to your path. On Windows use
$ c:
$ cd \ethernut-4.1.1\nutapp-30d-ram\xsvfexec
$ SET PATH=C:\ethernut-4.1.1\nut\tools\win32;C:\Programs\GNUARM\bin;%PATH%
Now we build this Nut/OS application like any other with
$ make clean
$ make
arm-elf-gcc -c -mcpu=arm7tdmi -O0 -mthumb-interwork -fomit-frame-pointer -Wall -Wstrict-prototypes
    -fverbose-asm -Wa,-ahlms=xsvfexec.lst -DETHERNUT3 -Ic:/ethernut-4.1.1/nutbld-30d-ram/include
    -Ic:/ethernut-4.1.1/nut/include  xsvfexec.c -o xsvfexec.o
arm-elf-gcc -c -mcpu=arm7tdmi -O0 -mthumb-interwork -fomit-frame-pointer -Wall -Wstrict-prototypes
    -fverbose-asm -Wa,-ahlms=tapsm.lst -DETHERNUT3 -Ic:/ethernut-4.1.1/nutbld-30d-ram/include
    -Ic:/ethernut-4.1.1/nut/include  tapsm.c -o tapsm.o
arm-elf-gcc -c -mcpu=arm7tdmi -O0 -mthumb-interwork -fomit-frame-pointer -Wall -Wstrict-prototypes
    -fverbose-asm -Wa,-ahlms=host.lst -DETHERNUT3 -Ic:/ethernut-4.1.1/nutbld-30d-ram/include
    -Ic:/ethernut-4.1.1/nut/include  host.c -o host.o
crurom -r -ourom.c cpld
arm-elf-gcc -c -mcpu=arm7tdmi -O0 -mthumb-interwork -fomit-frame-pointer -Wall -Wstrict-prototypes
    -fverbose-asm -Wa,-ahlms=urom.lst -DETHERNUT3 -Ic:/ethernut-4.1.1/nutbld-30d-ram/include
    -Ic:/ethernut-4.1.1/nut/include  urom.c -o urom.o
arm-elf-gcc xsvfexec.o tapsm.o host.o urom.o -mcpu=arm7tdmi -nostartfiles
    -Tc:/ethernut-4.1.1/nut/arch/arm/ldscripts/at91_ram.ld -Wl,-Map=xsvfexec.map,--cref,--no-warn-mismatch
    -Lc:/ethernut-4.1.1/nutbld-30d-ram/lib c:/ethernut-4.1.1/nutbld-30d-ram/lib/nutinit.o -lnutfs
    -lnutcrt -lnutos -lnutarch -lnutdev  -o xsvfexec.elf
arm-elf-objcopy -O ihex xsvfexec.elf xsvfexec.hex
arm-elf-objcopy -O binary xsvfexec.elf xsvfexec.bin
rm xsvfexec.elfThe resulting file we are interested in is the raw binary image of our application, named xsvfexec.bin. If we enter
$ make install
cp xsvfexec.hex c:/ethernut-4.1.1/nut/bin/arm7tdmi/xsvfexec.hex
cp xsvfexec.bin c:/ethernut-4.1.1/nut/bin/arm7tdmi/xsvfexec.bin
Now use the bootloader as explained in the Ethernut 3 Hardware Manual. Windows users will prefer TFTP32D to transfer the image to the Ethernut 3 RAM. Make sure to have set up everything as described in the Ethernut 3 Hardware Manual with the TFTP server and the terminal emulator running on your PC. Now press the reset button on the Ethernut Board and the space bar in your terminal emulator, where the BootMon bootloader will prompt you for the configuration.
BootMon 1.0.2

MAC address (000698300035):
IP address (192.168.192.35):
Net mask (255.255.255.0):
Default route (0.0.0.0):
TFTP IP (192.168.192.222):
TFTP Image (httpserv.bin): xsvfexec.bin
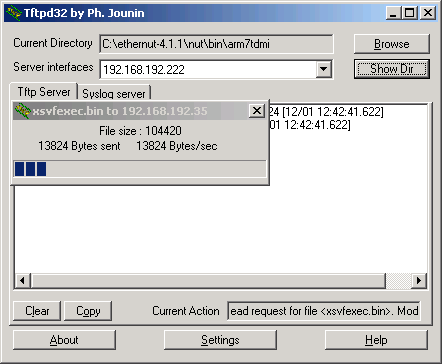
Soon after the TFTP upload finished, the XSVF Executor banner will appear in the terminal emulator window.
100 XSVF-Executor 1.1.2 on Nut/OS 4.1.1.0
Now the board is in an extremly critical phase and you should keep your hands off until the message.
199 OK
Your's doesn't? It shows the following message instead?
402 ERROR
Here are the required jumpering to enable the CPU to control the CPLD JTAG lines.
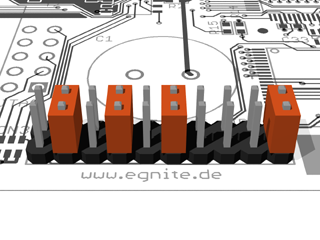
After pwoering up your board with this jumper configuration, BootMon will load the XSVF Executor again, which should then report
199 OK
Congratulations!
You should not forget to set the jumpers back to the default. Otherwise other applications may toggle the port bits used for CPLD programming with undetermined results.