
Solving Ethernut 3.0 / 3.1 Incompatibilities
When upgrading from Ethernut 3.0 to Ethernut 3.1, rebuilding of existing binaries is required. This applies to both, the Nut/OS libraries and your application code. The relevant changes are
- The X12x6 RTC had been replaced by the PCF8563T, requiring a different driver.
- Ethernut 3.0 uses the EEPROM in the RTC chip to store its configuration. Ethernut 3.1 uses the last page of the serial DataFlash.
- The DM9000 Ethernet controller had been replaced by the DM9000A. As it turned out recently, both chips are not as compatible as expected.
ethernut31d-support.zip
This archive contains several binaries and source code, which is described in more
detail in this article.
Configuring Nut/OS
In the Windows installation of Nut/OS version 4.8.5, the configuration file of Ethernut 3.1 is missing. Due to the different hardware layout, the configuration for Ethernut 3.0 will not work for Ethernut 3.1.
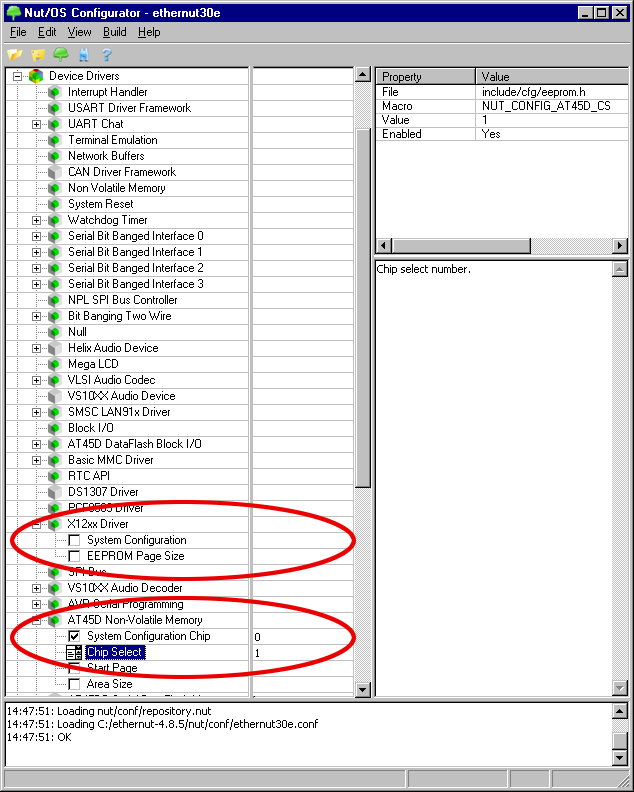
Load ethernut30e.conf into the Configurator and do the following modifications:
- Unselect System Configuration in Device Drivers->X12xx Driver.
- Select System Configuration Chip in Device Drivers->AT45D Non-Volatile Memory and set the value to 0.
- Set Chip Select in Device Drivers->AT45D Non-Volatile Memory to 1.
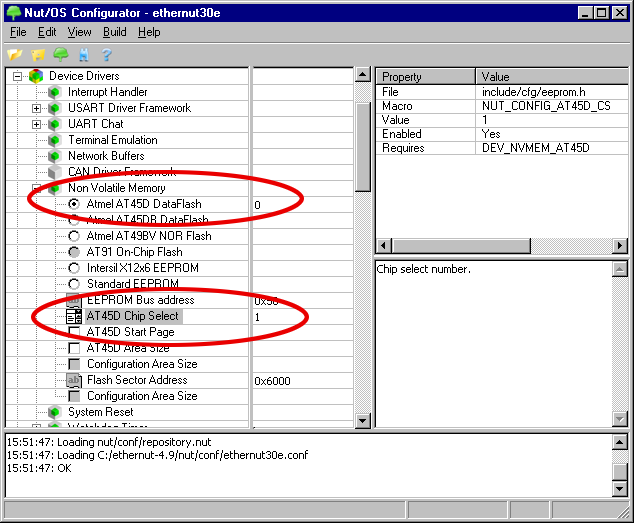
The configuration items had been re-organized in later versions. Since Nut/OS 4.9 the non-volatile memory options are collected under Device Drivers->Non Volatile Memory.
When done, save the new configuration to ethernut31d.conf. You may also update the Configurator settings (Edit Settings).
Instead of using the GUI Configurator you can also apply the changes with a simple text editor. Load nut/conf/ethernut30e.conf, remove the line
NUT_CONFIG_X12RTC = ""
and add these two lines.
NUT_CONFIG_AT45D = "0"
NUT_CONFIG_AT45D_CS = "1"
Save the modified file as nut/conf/ethernut31d.conf.
After rebuilding Nut/OS and your application, the board will now use the last page of the serial DataFlash to store its configuration. When using the bootloader, then the configuration will be already available for your application code.
Time and Calendar Functions
The RTC chip is selected in the application by calling NutRegisterRtc(). Thus, replacing
#include <dev/x12rtc.h>
...
NutRegisterRtc(&rtcX12x6)
by
#include <dev/pcf8563.h>
...
NutRegisterRtc(&rtcPcf8563)
is all you need to do to get your RTC on Ethernut 3.1 up and running.
Many applications samples are written for all Ethernuts and use the RTC_CHIP macro provided by dev/board.h. Unfortunately all version 3 boards are handled the same way. There is no distinct setting for Ethernut 3.1 and you will end up with the wrong RTC configuration.
#include <dev/pcf8563.h>
...
NutRegisterRtc(&RTC_CHIP);
One solution is to define RTC_CHIP in your Makefile.
#include <dev/pcf8563.h>
...
HWDEF+=-DRTC_CHIP=rtcPcf8563
Another, more advanced solution is given below in the chapter "Creating Compatible Binaries".
Ethernet Problems
When using a network hub (instead of a network switch), packet collisions may appear. It turned out, that the DM9000A does not retransmit them automatically by default.
Until a fix is available in the official distribution, you may set the RLCP flag in the transmit control register by adding the following line
nic_outb(0x2D, 0x40);
to
nut/arch/arm/dev/dm9000e.c
Add the line to the NicStart() function, immediately before the enabling the receiver. Do not forget to rebuild Nut/OS.
Bootloader
The bootloader has been modified as well, because it needs to access the right non-volatile memory to store its configuration. An updated bootloader is available in the Ethernut 3.1 support package.
Ethernut 3.1 CPLD
Michael Fischer, the guy who created YAGARTO, contributed the right HDL code for Ethernut 3.1. He preferred VHDL, so there's currently no Verilog code available.
The support package contains Michael's code together with the XSVF Executor binary. The NPL version of the Ethernut 3.1 CPLD is 16.
Creating Compatible Binaries
As explained above, your Ethernut 3.0 application code must be rebuilt for Ethernut 3.1. Different hardware versions may turn out as a big maintenance problem, though. If upgrading your applications, you may not want to provide different binaries for Ethernut 3.0 and Ethernut 3.1.
At the cost of slightly larger code, it is possible to build binaries, which run on both boards.
The Ethernut 3.1 support package contains the module enut3compat.c with its associated header file enut3compat.h. When adding the C source to your application, it will override several Nut/OS library parts and automatically select the right hardware, depending on the board it is running on. The two sample applications caltime and logtime had been added to the support package and demonstrate the usage of enut3compat.
Required steps are:
- Copy enut3compat.c and enut3compat.h into your application's build directory.
- Add #include "enut3compat.h" to your source file, typically the one that contains the main routine.
- Add enut3compat.c to the end of the SRCS= line in your application's Makefile.
- Rebuild your application using make clean all.
The resulting binary should run on Ethernut 3.0 as well as Ethernut 3.1. You application may also call EthernutMinorVersion(), which will return 0 on Ethernut 3.0 and 1 on Ethernut 3.1.
printf("Running on Ethernut 3.%d\n", EthernutMinorVersion());