
Complete Firmware Update
The firmware on Ethernut 5 is mainly stored in serial Flash memory. Only the first stage bootloader in located in internal Flash memory of the CPU.
| Image File | Flash Location |
|---|---|
| samboot.bin First stage boot loader |
SAM9XE internal flash at offset 0 |
| env-ethernut5.bin Image of a full-blown U-Boot environment |
Serial flash at offset 0x21000 |
| u-boot-ethernut5.bin Image of the U-Boot boot loader |
Serial flash at offset 0x42000 |
| uImage-ethernut5.itb Linux kernel image in U-Boot readable format |
Serial flash at offset 0xC6000 |
| nutos.bin Nut/OS application binary |
Serial flash at offset 0x35A000 |
The image files are available in the Flasher Tool package, which is available on the download page. Typically you will use U-Boot to update specific firmware images via TFTP. This is explained in the chapter "Partial Updates" below. If U-Boot fails to start, you can use the Flasher Tool to recover your Ethernut 5 board and set back everything to its initial state.
Using the Flasher Tool
The Ethernut 5 Flasher Tool is just a large binary named en5flasher.bin. It contains several binary images. When the flasher tool is uploaded and executed in the SDRAM of Ethernut 5, it will program all these images into the proper flash locations, printing its progress on the serial port at 115200,8,n,1. In order to minimize wear-out, each page is first verified against the updated image and flashed only, if the content differs. When running the same Flasher Tool image a second time, no bytes will be updated. This can be used to verify the result of the first run.
Image 'UROM:samboot.bin': Starting at 00200000, page 0
0 of 4536 bytes updated.
GPNVM3 already set.
Image 'UROM:env-ethernut5.bin': Starting at 00021000, page 256
0 of 5894 bytes updated.
Image 'UROM:u-boot-ethernut5.bin': Starting at 00042000, page 512
0 of 421168 bytes updated.
Image 'UROM:uImage-ethernut5.bin': Starting at 000C6000, page 1536
0 of 2341404 bytes updated.
Image 'UROM:nutos.bin': Not available, result=2.
Ready
Depending on the version of the tool and the underlying libraries, your output may slightly differ. The message about a missing nutos.bin can be ignored, as this image is typically not included in the package.
Depending on the current contents of the DataFlash and the tools that are available for your PC's operating system, there are several ways to get the Flasher Tool uploaded to your Ethernut 5 board.
The Flasher Tool itself (including the latest binaries) is available on the download page. After downloading, unpack the archive into a directory of your choice. Actually, the Flasher Tool is a Nut/OS application. If you have Nut/OS installed, you may want to build the Flasher Tool yourself. In this case unpack the archive in your nutapp sample directory that you created with the Nut/OS Configurator. You can then build the tool like any other Nut/OS application.
Upload the Flasher Tool via JTAG
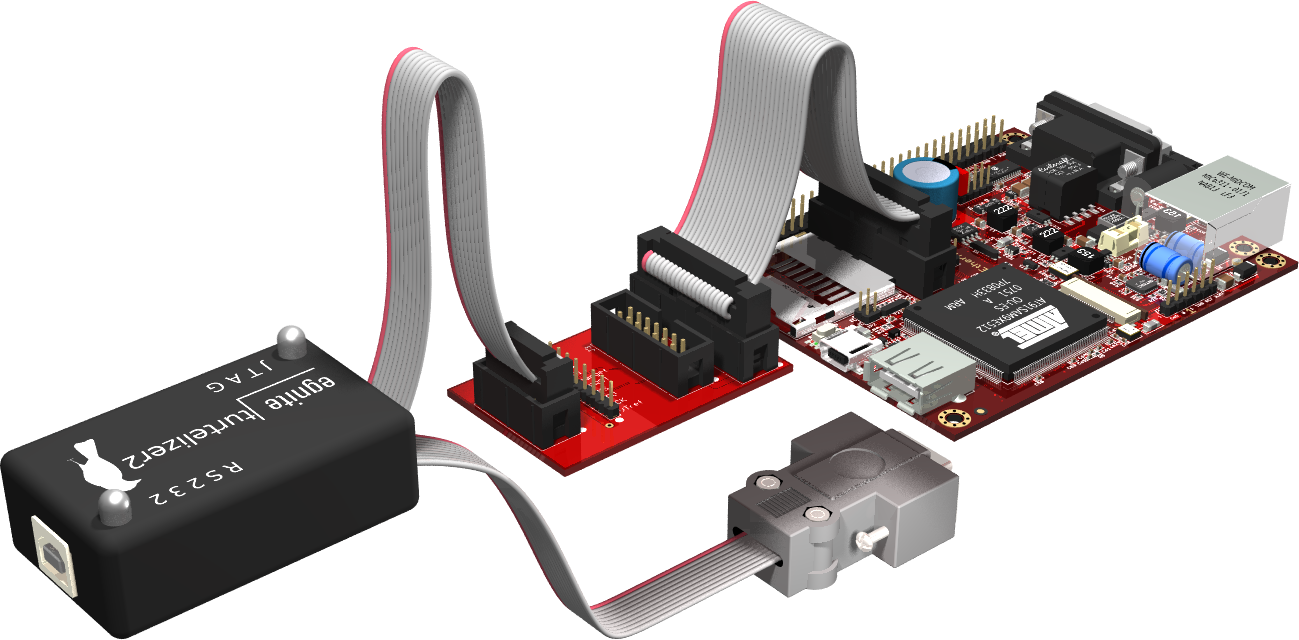
This method should work in almost any case. However, you need additional hardware and software to be able to access the Ethernut 5 JTAG interface. I will exemplarily explain the procedure using Turtelizer 2 hardware and OpenOCD software. If you prefer different JTAG tools, the required steps should be quite similar.
First, install OpenOCD. For Windows users I'd recommend the Turtelizer 2 package together with the FTDI driver, which are both available on egnite's website.
For historical reasons, Turtelizer provides a 10-pin JTAG connector, while Ethernut 5 has a standard 20-pin connector. Thus, an additional adapter is required. The following picture shows how to attach the Turtelizer to your Ethernut 5 board. Note, that any power supply must be removed from the Ethernut board when plugging in the 20-pin JTAG connector.
As usual, connect the RS-232 connector of the Ethernut to a COM port of your PC and start a terminal emulator. Then apply power to the board. If the board already has a boot loader, you should stop the boot process, as explained in the Ethernut 5 hardware manual. During JTAG access the CPU will be stopped and reset, which may corrupt the file system when Linux is running.
On the PC open a command line window (shell) and change to the directory where you unpacked the en5flasher zip archive. Make sure, that the directory of the OpenOCD executable is included in the PATH environment. Windows users may need to enter
set PATH=c:\ethernut\nut\tools\win32;%PATH%
where the first part of the path may differ, if you installed the Turtelizer package in another location. Then start OpenOCD, using the command
openocd -s C:/ethernut/nut/tools/turtelizer2 \
        -c "source [find interface/turtelizer2.cfg]" \
        -c "source [find board/ethernut5.cfg]"
The backslashes used at the end of the first lines are the Unix way to continue the command on the following line. It is used here to split the line for readability and will not work on a Windows command line. Instead, enter all three lines in one large line, omitting the trailing backslashes.
If everything works as designed, you should get some output like
Open On-Chip Debugger 0.4.0-rc1 (2010-02-02-07:03)
For bug reports, read
        http://openocd.berlios.de/doc/doxygen/bugs.html
trst_and_srst separate srst_gates_jtag trst_push_pull srst_open_drain
jtag_nsrst_delay: 300
jtag_ntrst_delay: 200
RCLK - adaptive
srst_only separate srst_gates_jtag srst_open_drain
Info : device: 4 "2232C"
Info : deviceID: 67354056
Info : SerialNumber: TLU44E26A
Info : Description: Turtelizer JTAG/RS232 Adapter A
Info : RCLK (adaptive clock speed) not supported - fallback to 3 kHz
Info : JTAG tap: at91sam9xe512.cpu tap/device found: 0x0792603f
       (mfg: 0x01f, part: 0x7926, ver: 0x0)
Info : Embedded ICE version 6
Info : at91sam9xe512.cpu: hardware has 2 breakpoints or watchpoints
While OpenOCD is running in one command line window, open another one to start a Telnet client.
telnet localhost 4444
When connected, enter the following lines in the Telnet window:
reset init
load_image en5flasher.bin 0x20000000 bin
resume 0x20000000
The image is quite bulky and will need its time to upload. Be patient. After you entered the last line, which starts the flasher, you can watch its output on the terminal emulator. After the flasher finished its task, your Ethernut 5 is ready to reboot. On the Telnet window enter
shutdown
to stop OpenOCD. Keep the terminal emulator running and reset your Ethernut board. In the terminal emulator you should finally see SAMBoot first and then U-Boot, starting automatically after reset. However, booting the Linux kernel may still fail, because:
- The U-Boot Environment is not properly set.
- The NAND Flash contains no valid root file system.
Check the page Ethernut 5 Boot Loading for further details.
Upload the Flasher Tool with SAM-BA
This procedure will make use of the SAM-BA boot ROM, which allows to upload binaries using a USB cable only. Unfortunately, it may be tricky to get the SAM-BA utility running on Linux. For Windows it will work even on 64-bit systems if you use the CDC version of the SAM-BA tool. It is available free of charge (registration required) from Atmel's website. If not already done, install this tool now.
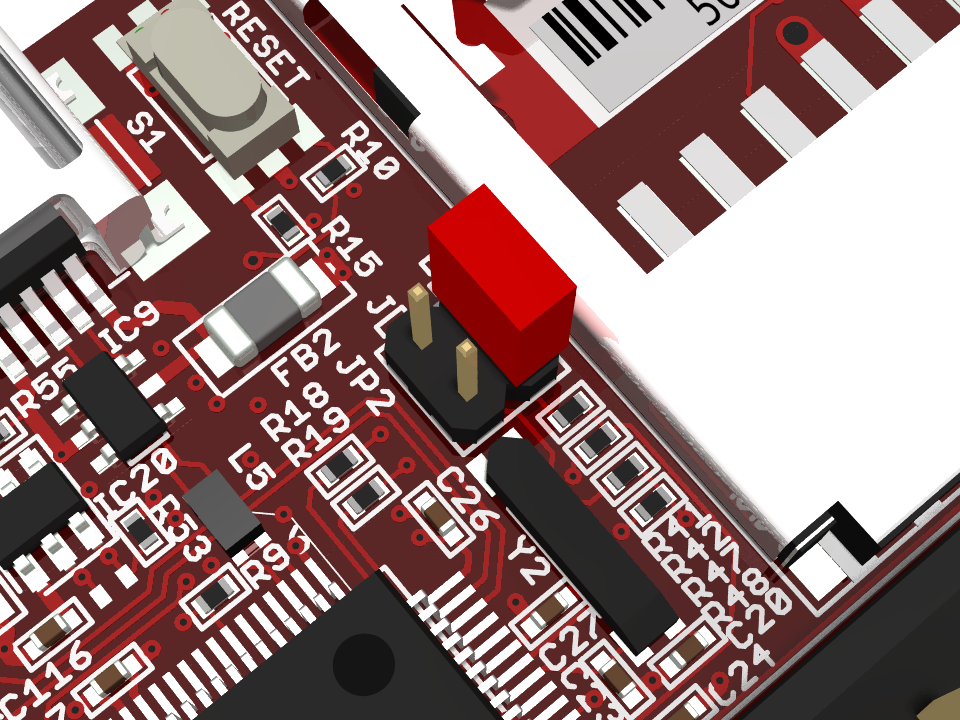
In order to activate the ROM boot loader on your Ethernut board, you must erase the internal Flash of the SAM9XE CPU by shortening pins 1 and 2 of JP2 and cycling the power supply. When done, the board will no longer boot automatically, because the first stage boot loader has been removed by the erase function of the chip.
Connect the RS-232 connector of the Ethernut to a COM port of your PC and start a terminal emulator, so you can monitor the output on the serial port. Consult the Ethernut 5 Hardware Manual for further details.
Now use a Mini-USB cable to connect the Ethernut to a free USB port of your PC. If done for the first time, this should automatically install the USB driver. The Ethernut board will be powered by USB, no external power supply is required.
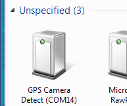
When started, SAM-BA may not immediately detect the Ethernut board. The problem is, that Windows Update fetches a wrong driver and the board appears as GPS Camera Detect. In this case, SAM-BA tries all available interfaces to locate the board, which takes time. Finally it
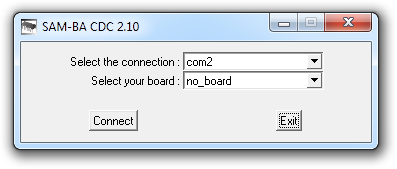
Start SAM-BA and select the AT91SAM9XE-EK board, which is almost compatible with Ethernut 5.
Upload the Flasher Tool with U-Boot
If U-Boot is up and running, you can either update single images (see next chapter) or upload and run the Flasher Tool to update all images in one go, which will be explained now.
Make sure, that your TFTP server is running and copy en5flasher.bin to the TFTP download directory.
On the U-Boot command line prompt enter
run netconf
tftpboot 0x20000000 192.168.0.1:en5flasher.bin
go 0x20000000
to initialize the network, load the Flasher Tool into SDRAM (at address 0x20000000) and start it. On the second line replace 192.168.0.1 with the IP address of the PC that runs the TFTP server.
If the netconf script is not available, you may alternatively try the dhcp command.
Updating the Root Filesystem
The file system image ethernut5-image-ethernut5.jffs2 is available on the download page. If your U-Boot environment has been properly setup, you can use the following command on the U-Boot command line to update the root filesystem via TFTP. Please note, that the previous contents of the root partition will be lost.
setenv tftpserverip 192.168.0.1
run installrootfs
Again, replace 192.168.0.1 with the IP address of your machine running the TFTP server. The installrootfs script may not be available or may fail, if you do not have a working U-Boot Environment. Alternatively try
mtdparts default
nand erase.part clean root
dhcp
tftpboot ${loadaddr} 192.168.0.1:ethernut5-image-ethernut5.jffs2
nand write ${loadaddr} root ${filesize}
Partial Updates
You may not want to update all images that are contained in the Flasher Tool. Beside the Flasher Tool binary, the archive also provides the individual images, located in subdirectory urom.
Update with SAM-BA
If you spoiled the U-Boot image, using SAM-BA is a good way to fix this.
Update with U-Boot
If U-Boot is already available on Ethernut 5, it can be used to update all images, which are stored in the serial Flash. However, it is currently not possible to update the internal Flash of the CPU. Thus, you cannot use U-Boot to update the first stage boot loader.