
Ethernet Boot Loaders for AVR
The Ethernet boot loaders for the AVR based Ethernut boards fit into the upper section of the program memory and use DHCP and TFPT over Ethernet to download an application code into the ATmega128 flash ROM. They are intended as a replacement for the ISP programming dongle and update a 14 MHz ATmega128 in about 4 seconds or less.
The boot loader will be stored in upper program memory, while the application starts at address zero. By modifying the AVR's internal fuses, it is possible to start the boot loader on system reset, which may then upload a new application binary at address zero and run it by jumping at this location.
There are two versions of the boot loader. One is called eboot and works with Ethernut 1 or any other board with a RTL8019AS controller. The second one is called appload and supports the LAN91C111 controller, which is used on the Ethernut 2 board.
Important Warnings
1. According to the datasheet, the ATmega128 flash memory has an endurance of 10,000 write/erase cycles. Using a boot loader may wear out the flash memory. Fatal programming errors may reset your CPU, reloading the bad code over and over again and finally destroying your flash ROM.
2. Playing around with the fuse bits may disable your CPU. Do not change any of these bits unless you know what you do. There is some confusion about the terms programmed, unprogrammed, set, cleared, enabled or disabled. We will use terms given in the datasheet, programmed to 0 and unprogrammed to 1.
3. The boot loader uses the TFTP protocol, which is known to be insecure. When attached to a public network, do not enable TFTP write access on your computer without further access restrictions. For the boot loader you can limit TFTP read access to a single directory only.
Are these warnings scaring you? That's fine. So you are aware of the risks and will take precautions to avoid damage.
Ethernut 1 Boot Loader
A precompiled binary of the eboot boot loader is available on the Ethernut 1 hardware page. To transfer the binary to the target board, several tools are available for in-system programming. The following command can be used with AVRDUDE and any STK500v2 compatible programming adapter like the SP Duo.
avrdude -p m128 -P com2 -c stk500v2 -V -U flash:w:eboot.hex
If you plan to integrate the boot loader into your final Ethernut based product, you may need to modify the source code and build a new binary. Unfortunately the source code include in Nut/OS 4.8 will not work with the latest avr-gcc compiler, because the stack pointer will no longer be initialized when entering the main routine.
A new version 2 of the boot loader is available, which offers several enhancements and corrections.
- Works again with the latest compilers.
- Optionally uses network settings stored in EEPROM.
- Optionally uses TFTP settings stored in EEPROM.
eboot20-src.zip
This archive contains the enhanced version of the eboot boot loader.
eboot20-bin.zip
Precompiled binaries (bin and hex) of the above, located at word address 0xF000.
You can disable or enable a few options by editing the DEFS entries in the Makedefs file.
-
DEFS += -DEE_CONFNET=64
Specifies the EEPROM address of the network configuration. 64 is the default, which is also used by Nut/OS applications unless you modified the settings in the Configurator. If this line is commented out, then the bootloader will try to get all information from the DHCP server. Additional information about Nut/OS network settings are available in the Nut/OS Software Manual. -
DEFS += -DEE_CONFBOOT=256
Specifies the EEPROM start address of the TFTP configuration. Make sure, that this area is not used by you application code. The required size mainly depends on the CONFBOOT structure, defined in config.h.If you do not need 128 bytes for the name of the boot image file, you can reduce the size of cb_image. A sample application, which will create a valid entry for the boot loader, is given below. If this line is commented out, then the bootloader expects this information from the DHCP server.struct _CONFBOOT { u_char cb_size; u_char cb_flags; u_long cb_tftp_ip; u_char cb_image[128]; }; -
DEFS += -DNUTDEBUG
Enables debug output on UART0 using 115200 baud on an ATmega running at 14.745 MHz. This will be helpful, if you modifications are not working as expected. The following routines are available:DEBUG(char *); /* Prints out a string. */ DEBUGUSHORT(unsigned short); /* Prints out a short value in hex format. */ DEBUGULONG(unsigned long); /* Prints out a long value in hex format. */
Ethernut 2 Boot Loader
You can download a precompiled binary of the appload boot loader from the Ethernut 2 hardware page. It is quite similar to the eboot boot loader for Ethernut 1.
The source code is included in the Nut/OS distribution. Like the Ethernut 1 boot loader, this one may fail when compiled with the latest avr-gcc versions. Make sure that the following lines are available in the file start.S:
ldi     r18, lo8(RAMEND)
out     _SFR_IO_ADDR(SPL), r18
ldi     r18, hi8(RAMEND)
out     _SFR_IO_ADDR(SPH), r18
Creating Bootable Applications
Without a boot loader, your application code is compiled and linked into Intel or Motorola hex files, which are then uploaded via in-system programming to the target board. These hex files (file extension hex) contain address information and therefore allow to upload code to any location.
In contrary, the AVR boot loaders need pure binary images (file extension bin), which are always stored at the beginning of the flash memory area. Usually the command 'make clean all' will produce both, Intel hex and pure binaries. Otherwise you may try 'make appname.bin' or directly use avr-objcopy
avr-objcopy -O binary appname.elf appname.bin
The ImageCraft compiler doesn't provide anything to create raw binary files for the boot loader. Fortunately a simple tool named robi can be integrated into the ICCAVR IDE to take over this task.
Download robi, unpack the archive and move robi.exe to a directory of your choice, preferably your ICCAVR bin directory or any directory included in your PATH environment variable.
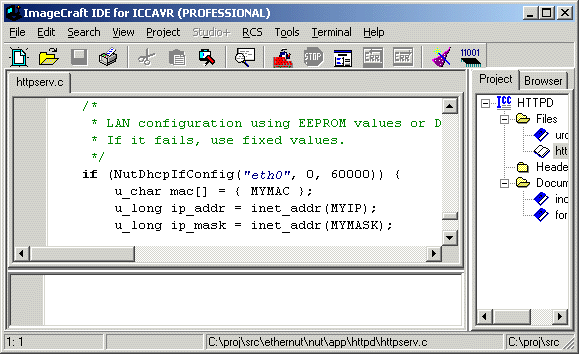
Start the ImageCraft IDE, load the appliocation's project and select Project Options from the main menu to open the compiler options dialog. Select the compiler tab and enter the command shown to be executed after a successful build.
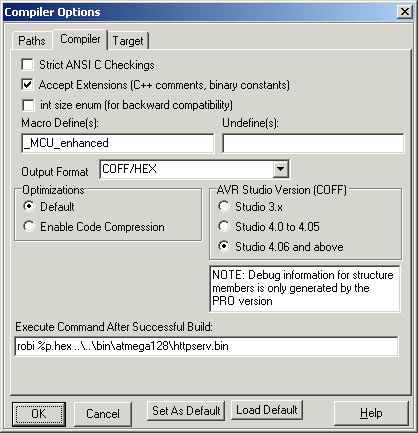
Each time you build your project, the following output will additionally appear in the IDE status window.

The robi utility converts the hex file containing the application code to a raw image and stores it in the base directory of TFTPD.
Ethernut Setup
First you need to upload the boot loader hex file to the Ethernut board using an ISP adapter. Unfortunately a few old programming tools are able to upload a hex file to the upper half of the flash ROM. Make sure, that the upload has been successful by reading back the flash contents. Depending on the size of the boot loader binary, its code should start at byte addresses 0x1E000 or 0x1F000, which is equivalent to word address 0xF000 or 0xF800 resp.
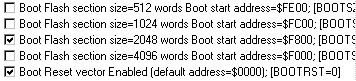
After uploading the boot loader, you need to modify the ATmega128 fuses. The following three fuse bits of the ATmega128 fuse high byte need to be set to the specified values.
Bit |
Fuse |
Description |
2 |
BOOTSZ1 |
Program to 0 to select the bootloader size of 4 or 8 kBytes |
1 |
BOOTSZ0 |
Unprogram to 1 to select the bootloader size of 4 kBytes or program to 0 to select the bootloader size of 8 kBytes |
0 |
BOOTRST |
Program to 0 to force the CPU to jump to the boot loader upon reset |
On AVR Studio use this selection with a boot loader size of 4 kBytes:
TFTP Server Setup
When the boot loader starts, it will connect the DHCP server first to load query its network configuration. This may include the IP adress of the TFTP server and the name of the boot image to load from this server. As explained, the latest boot loader are able to read these settings from EEPROM as well.
While DHCP is a common network service, TFTP may not be available. On Linux, it is part of the OS, but it may not be enabled by default. Please refer to your Linux manual or related online sources. The mini-howtos at www.linux.org will be a good starting point.
For Windows PCs Philippe Jounin's TFTPD32 is the recommended solution, which we will now explain in more detail.
After having installed and started TFTPD32
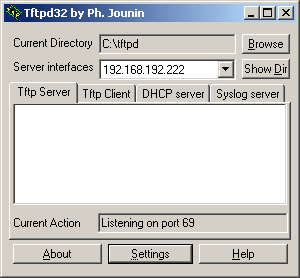
click on the button labeled Settings. This will open a new dialog window.
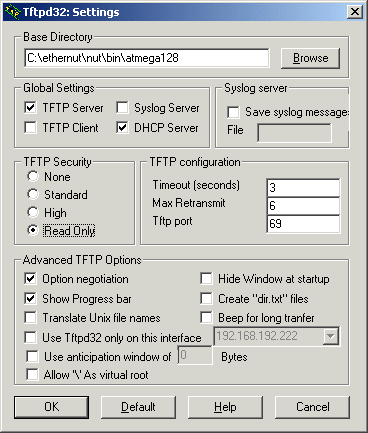
Select the options shown in the picture above. Your base directory may differ. Click on the browse button to select the subdirectory bin/atmega128 of your Nut/OS installation. Finally click OK and restart TFTPD32.
Now it is required to configure the DHCP server. Select the DHCP server tab.
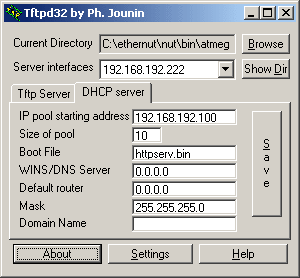
If more than one network interface has been installed on your computer, you can select the server interface your Ethernut board is connected to.
The Ethernet boot loader will request an IP address from the DHCP pool. Enter the IP pool starting address and the number of available addresses in the pool. The sample above will offer IP addresses from 192.168.192.100 upto and including 192.168.192.109.
The boot file is the name of the raw binary image of the application you want to upload to the Ethernut board. When using WinAVR (AVRGCC), you simply enter make install on the command line. This will automatically compile and link your code and copy the resulting hex file and binary file to the subdirectory bin/atmega128. ICCAVR is not able to create raw binary images. A tool named robi has been created, which will be explained later.
There's no need to specify a WINS/DNS server address or default router unless your Ethernut application requires direct Internet access. In case it does, you probably know what to enter.
Make sure that the network mask and the IP pool addresses fit your local network configuration.
Finally press Save to let TFTPD32 store the values in the Windows registry and select the Tftp Server tab to return to the initial window. Now press the reset switch on your Ethernut board an watch the magic things happening.
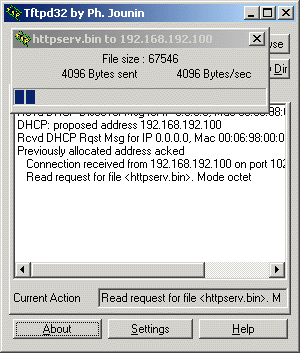
Ethernut will immediately jump to the boot loader, which broadcasts a DHCP request to the network. TFTPD32 will offer the first IP address from the pool and provide additional network information, including the file name of the boot image. In turn, Ethernut will request this file from the TFTP server, burn it into its program flash and finally jump to program memory address 0x0000 to execute the newly loaded application.
Creating Upgradeable Applications
While the Ethernet boot loader is very convenient during development, it can be used as well in the field to update the application code.
testnetupd.zip
This archive contains precompiled binaries for Ethernut 1 and the
source code, which can be used to create a binary for Ethernut 2.
And, most important, you may use this code to implement it into
your application. Of course your requirements may differ. For example,
you may keep the BOOTRST fuse unprogrammed and always jump to the
boot loader from within your application. Furthermore, your
application may use a different ways to initiate the a firmware
upgrade. In any case our sample application will provide a helpful
starting point.
When started, the sample code will produce the following output at the serial port:
Network Update Test 2.0 running on Nut/OS 4.9.9.0
Opening line editor...OK

TFTP Server IP: 0.0.0.0
Boot Image    : ""

  L - Load boot configuration
  E - Enter boot configuration
  S - Save boot configuration
  D - Delete boot configuration
  R - Reset system
  J - Jump to boot loader
-
Press L
to read the TFTP configuration (the CONFBOOT structure we explained above) from EEPROM. This is done on program start anyway, but may be used to discard any modifications. -
Press E
to enter the IP address of the TFTP server and the name of the image file to boot. Note, that your entry will not be written back to EEPROM unless you ... -
Press S
to save the current TFTP configuration in EEPROM. -
Press D
to delete the TFTP configuration. With an empty configuration, the boot loader will try to get this information from DHCP. If DHCP doesn't offer it, then the boot loader will start the application that is currently stored in flash memory. -
Press R
to reset the Ethernut board. The application will call NutReset, which will enable the watchdog timer hardware and let it time out. This is usually the most reliable way to restart an AVR. -
Press J
to directly jump in to the boot loader code.
Upgrading the firmware can become tricky, specifically when the boot loading process fails. Imagine a power failure during the TFTP transfer, which leaves the program memory with partly old and partly upgraded areas. Most probably, your application will crash when started. If it uses the hardware watchdog, you may be lucky and the system reset will initiate the boot loader again.
A more advanced upgrade method may use a CRC to verify, that the loaded boot image is valid. The boot loader may not return to the application, if the CRC check fails. To make this work, not only the code of the boot loader must be changed, you also must create special images, where the CRC is included. An even more advanced method may use encrypted images. Whatever, you should make sure, that an interrupted firmware upgrade will not end up with a dead system.
If enough additional memory is available, like serial Dataflash or RAM on Ethernut 2, you may not need an Ethernet boot loader at all. Instead you can load a new image from within your application (e.g. web upload) into the Dataflash and then use a much simpler boot loader to move this image from the Dataflash to program flash. You will only do this, if you are sure that the image is complete and valid.
To Do List
The boot loader may update the Nut/OS EEPROM configuration.
Flash contents should be verified after programming.
Possibly add PPP support.
Temporarily store received image in RAM and start programming the flash after upload has been successfully completed.
Links
More information about BOOTP and DHCP is available at www.dhcp.org