
Turtelizer 2 User's Guide

Requirements
It is assumed, that you have an idea of cross-platform development and in-system programming.
In the first place you need the Turtelizer hardware. Turtelizer 2 is an open source hardware project. If you want to build the hardware yourself, you can download the CAD files from this page. Ready built devices are available from various sources, some of them are listed here.
The Turtelizer 2 JTAG connector follows the AVR 10-pin layout. A special adapter is required to connect it to the 20- or 14-pin standard connector that is used on most ARM boards.
To debug or flash your target board, you need a PC with USB interface. Turtelizer 2 can be used on Linux, Mac OS X and Windows PCs.
In the first place, Turtelizer had been designed to work with OpenOCD (Open On-Chip Debugger), a free software tool for debugging ARM targets. In addition, OpenOCD is able to program many kind of flash memories.
How OpenOCD Works
OpenOCD is running as a TCP server (3) and provides a link between a debugger (2) like gdb and the driver which controls the debugging hardware. The debugger connects to the OpenOCD server via a TCP port (3333 by default), either at the local or any remote host.
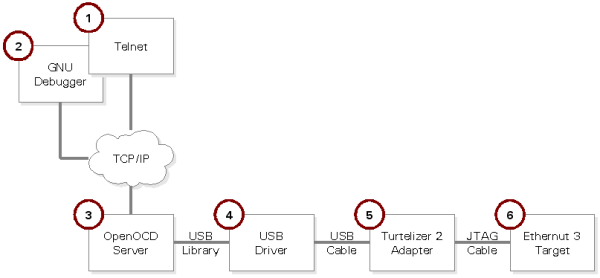
An additional command line interface is offered by OpenOCD on a second TCP port (4444 by default). Either a special application or a human user may make use of this interface to control OpenOCD. In the latter case TELNET (1) will be the right tool to send commands to and receive responses from the OpenOCD server.
OpenOCD supports a wide variety of debugging hardware, one of which are FT2232 based JTAG adapters like Turtelizer 2. In this case OpenOCD makes use of an external library to communicate with the USB driver (4). The resulting commands are transfered to the adapter (5), which in turn translates these command to activities at the JTAG port of the target (6).
In the following chapters I will explain how to basically install and configure OpenOCD. More details are OpenOCD User's Guide
Installing OpenOCD on a Windows PC
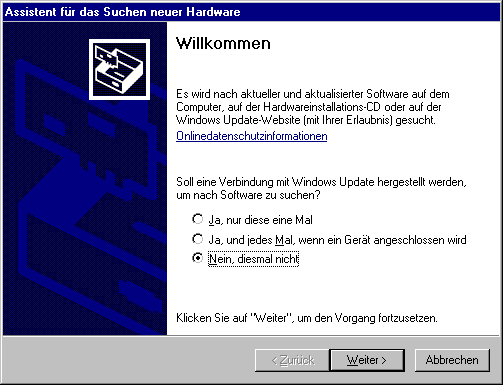
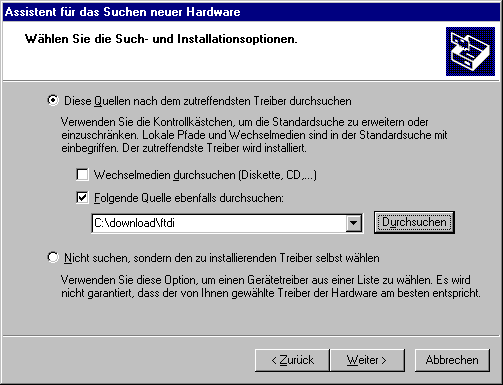
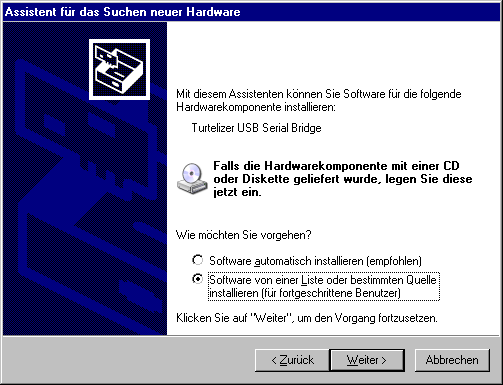
Step 1: Download the latest FTDI driver for Turtelizer 2, available under resources on egnite's product page. Unpack the Zip archive into any directory of your choice.
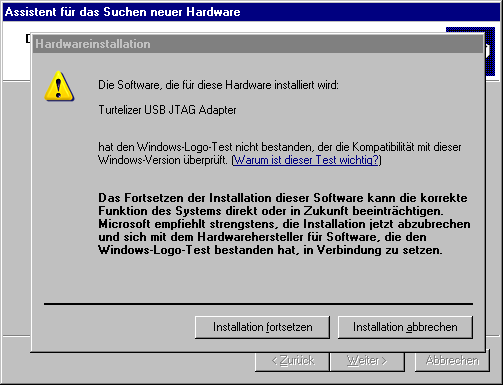
Step 2: Connect one end of the USB cable to the PC USB port and the other to the USB connector on the Turtelizer. Windows will automatically detect the new Turtelizer hardware. Concurrently the first screen of the Found New Hardware Wizard appears. Follow the instruction. Make sure that the option Specify a location is selected and deselect all others. The driver is located in the folder where you unpacked the Zip archive in step 1.
Note that the Turtelizer adapter has 2 interfaces, the JTAG adapter and the USB/RS232 bridge. The driver for the JTAG interface will be installed first.


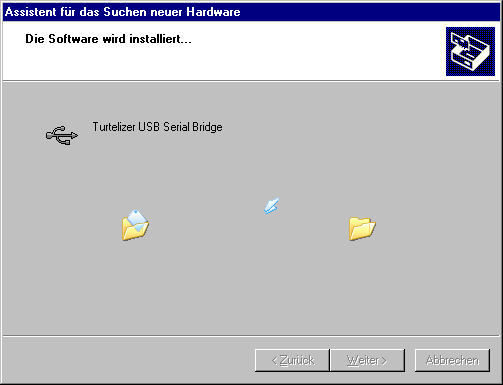
Next the driver for the USB/RS232 bridge will be installed.


Step 3: Download the latest OpenOCD installer package for Turtelizer 2 from egnite's product page. The installation is easily done by starting the installation executable and pressing a few buttons.
If you have installed Nut/OS previously, the OpenOCD installer will automatically detect the Nut/OS installation directory and place the OpenOCD binary into nut\tools\win32 and the OpenOCD configuration in nut\tools\turtelizer2.


When done, you should find the new entry Turtelizer 2 in the Windows start menu.
Installation on a Linux PC
NOTE: The following description is outdated, but may still work for you.
The OpenOCD source code can be retrieved from the SVN repository at developer.berlios.de/svn .
$ svn co -r 717 svn://svn.berlios.de/openocd/trunk openocd-r717The included README file contains a detailed description. A few essential tools are required to create the binaries. The following commands may be used on Debian to make sure that all tools are available:
$ sudo apt-get install build-essential
$ sudo apt-get install automake
$ sudo apt-get install autoconf
If not already installed, we further need the FTDI support library. There are two variants, we chose the one supplied by FTDI:
$ wget http://www.ftdichip.com/Drivers/D2XX/Linux/libftd2xx0.4.13.tar.gz
$ tar -zxf libftd2xx0.4.13.tar.gz
$ sudo cp *.h /usr/local/include/
$ sudo cp libftd2xx.so.0.4.13 /usr/local/lib/
$ cd /usr/local/lib/
$ sudo ln -s libftd2xx.so.0.4.13 libftd2xx.so
$ sudo ln -s libftd2xx.so.0.4.13 libftd2xx.so.0
$ cd /usr/lib/
$ ln -s /usr/local/lib/libftd2xx.so.0.4.13 libftd2xx.so.0
/etc/fstab (sudo):
none /proc/bus/usb usbdevfs defaults,mode=0666 0 0
(use usbfs in 2.6 kernels, 'uname -a')
$ sudo mount -a
In the next step we can build OpenOCD, using
$ cd openocd-r717/
$ ./bootstrap
$ ./configure  --enable-ft2232_ftd2xx
$ make
$ sudo make install
The following entry should appear in /proc/bus/usb/devices after plugging in the Turtelizer 2:
T:  Bus=01 Lev=01 Prnt=01 Port=00 Cnt=01 Dev#=  4 Spd=12  MxCh= 0
D:  Ver= 2.00 Cls=00(>ifc ) Sub=00 Prot=00 MxPS= 8 #Cfgs=  1
P:  Vendor=0403 ProdID=bdc8 Rev= 5.00
S:  Manufacturer=egnite
S:  Product=Turtelizer JTAG/RS232 Adapter
S:  SerialNumber=TLQ08BET
C:* #Ifs= 2 Cfg#= 1 Atr=80 MxPwr=100mA
I:  If#= 0 Alt= 0 #EPs= 2 Cls=ff(vend.) Sub=ff Prot=ff Driver=(none)
E:  Ad=81(I) Atr=02(Bulk) MxPS=  64 Ivl=0ms
E:  Ad=02(O) Atr=02(Bulk) MxPS=  64 Ivl=0ms
I:  If#= 1 Alt= 0 #EPs= 2 Cls=ff(vend.) Sub=ff Prot=ff Driver=(none)
E:  Ad=83(I) Atr=02(Bulk) MxPS=  64 Ivl=0ms
E:  Ad=04(O) Atr=02(Bulk) MxPS=  64 Ivl=0ms
Installation on a Mac
NOTE: The following description is outdated, but may still work for you.
If not already done, download Xcode from
developer.apple.com/tools/xcode/
and install it. Xcode contains all the GNU tools, which are
need to create the OpenOCD binary from the source code.
 Download the Mac OS X driver from
www.ftdichip.com/Drivers/D2XX.htm
The driver is packed in a disk image file. Double click it to
mount the image.
To install the driver, open Terminal and execute the following commands:
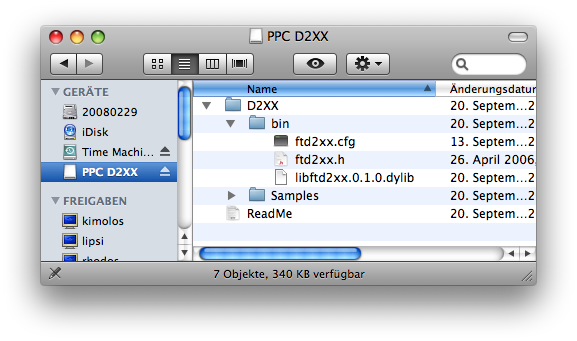
$ cd /Volumes/PPC\ D2XX/D2XX/
$ sudo mkdir -p /usr/local/lib /usr/local/include
$ sudo cp bin/libftd2xx.0.1.0.dylib /usr/local/lib/
$ sudo ln -sf /usr/local/lib/libftd2xx.0.1.0.dylib /usr/local/lib/libftd2xx.dylib
$ sudo cp bin/ftd2xx.h /usr/local/include/
$ sudo cp Samples/WinTypes.h /usr/local/include/
Retrieve the OpenOCD source code from the SVN repository at developer.berlios.de/svn . For this, open Terminal and enter:
$ svn co -r 717 svn://svn.berlios.de/openocd/trunk openocd-r717
Building and installing OpenOCD for OS X is similar to Linux. In a Terminal window enter:
$ cd openocd-r717/
$ ./bootstrap
$ ./configure  --enable-ft2232_ftd2xx
$ make
$ sudo make install
Connecting the Target Board
Always make sure, that the target board's power supply is turned off when connecting or disconnecting the Turtelizer. Otherwise you risk to damage your Turtelizer, the target board or both.
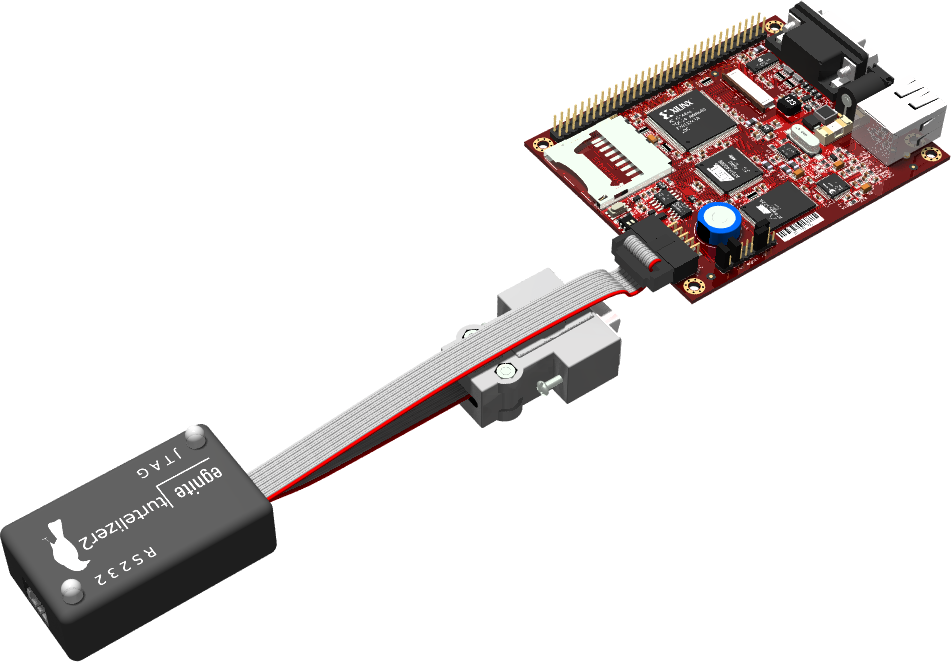
While most ARM boards provide a 20-pin JTAG interface (a few have just 14-pins), Turtelizer comes with a space saving 10-pin connector, which has a similar layout as Atmel's JTAG connector for the AVR series.
Near the end of the Turtelizer hardware page you can find the schematics of this adapter. egnite's online shop offers a JTAG connector adapter including cables, which allows to connect the Turtelizer to 20-pin as well as 14-pin interfaces. The following image shows how to connect the Turtelizer to a 20-pin interface (Ethernut 5 in this example).

A few boards, like Ethernut 3, got a fully compatible JTAG interface connector. No adapter is required here.
OpenOCD Interface Configuration
Turtelizer 2 is officially supported by OpenOCD, a Turtelizer configuration file turtelizer2.cfg is included in the source directory tcl/interface. There's actually not much in there.
interface ft2232
ft2232_device_desc "Turtelizer JTAG/RS232 Adapter"
ft2232_layout turtelizer2
ft2232_vid_pid 0x0403 0xbdc8
When using egnite's FTDI driver patches for Windows, the first entry needs to be changed to
interface turtle
OpenOCD Board Configuration
OpenOCD contains configuration files for several target boards. However, OpenOCD configuration changes quite often and some configuration files may become outdated between two relases. This often led to frustration in the past. On the other hand, it is understandable, that the OpenOCD maintainers are not able to check every hardware combination.
As noted above, the interface configuration is simple. Unfortunately, the board configuration is not. The OpenOCD User's Guide explains all the details. But there are many and quite some knowledge about ARM JTAG debugging and the target CPU is required to create a configuration for your specific target board.
The archive openocd-0.5.0-configs.zip contains configuration files for Ethernut 3, Ethernut 5 and the Elektor Internet Radio, which had been tested with OpenOCD 0.5.0.
Uploading Nut/OS Applications
If you are using Nut/OS, you may be aware, that you can re-compile, link and run applications in one go, using
make clean all burn
on the command line. To make this work, a properly configured Makeburn file must be placed in the app directory of the Nut/OS source tree. For OpenOCD, the file Makeburn.arm-oocd must used. It can be selected in the Configurator's last page of the settings dialog.
It had been and still is a real challenge to keep pace with OpenOCD's rapid changes. If the command is not working with your current Nut/OS version, you may try teh version of Makeburn.arm-oocd that is included in openocd-0.5.0-configs.zip.
Up to Nut/OS version 4.10, the file nut/app/Makeburn.arm-turtle was available too, but has been removed now and its functions had been included into Makeburn.arm-oocd. Before trying this file for the first time, you need to enable (un-comment) the line
BURNDONGLE = turtelizer2