
Using ImageCraft AVR
 This page will show you step by step, how to use the ImageCraft
Development Environment to build and debug a webserver sample.
This page will show you step by step, how to use the ImageCraft
Development Environment to build and debug a webserver sample.
An overview of all samples included in the Nut/OS distribution is available here.
Hardware Prerequisites
You need the following hardware tools for ICE Debugging:
A PC running Windows.
An Ethernut Board with an ATmega128 or ATmega2561 CPU and a JTAG connector, either Ethernut 1.3 Rev-G or Ethernut 2.
An AVR JTAG ICE In-Circuit Emulator. This part can be purchased from you local Atmel distributor.
With these tools you can debug an applications directly on the target hardware.
The JTAG ICE can't be used with old ATmega103 based boards, because this CPU has no JTAG interface. If you own an Ethernut 1.3 Rev-F or similar board with an ATmega128, you can use the adapter cable, that is included in Atmel's AVR JTAG ICE package. Instructions about how to connect this adapter are available here.
Ethernut boards version 2.0 offer a jumper to switch the programming connector between JTAG and ISP. This is explained in detail in the Ethernut 2.0 Hardware Manual
Ethernut boards version 2.1 support JTAG only. Note, that the SP-Duo programmer, which comes with the Ethernut 2.1 Starter Kit, is no JTAG ICE and thus can't be used for debugging.
Anyway, even without the costly JTAG ICE you can still run TCP/IP applications and simply use the serial port to print debug messages.
Software Prerequisites
You need to download the following software tools:
- ImageCraft ICCV7 AVR Version 7.03C or later. If you want to compile for the ATmega2561, then get the ICCAVR 7.05BETA2 or later. The demo version may not work, because the sample server presented here may not fit into 64k Flash.
- Nut/OS Version 4.2.1 or any later version, available here. In the following text we will use x.y.z, which should be replaced by the Nut/OS Version you installed.
- AVR Studio 4.12 RC3 or later, available from Atmel .
We tested Nut/OS release 4.6 and 4.8 with ImageCraft V7.19 and experienced several problems. Please check the chapter "Solving Problems" below.
ATmega2561 Considerations
This part is still experimental. We succeeded to compile and run several samples on an Ethernut 2.1 Board, where the ATmega128 had been replaced by an ATmega2561. Nevertheless, several limits apply:
It is unknown, if code sizes above 128 kBytes are supported. At the time of this writing, the ImageCraft Compiler doesn't support indirect jumps to the upper half of Flash Memory. As long as the complete Nut/OS code, which uses a lot of indirect calls and jumps. is in the lower half and your application doesn't use indirect jumps, it may work. However, from experience we know, that many programs need a lot of program memory to store string literals, which are typically located in lower memory. This will move code to the upper half, where it may not work. Furthermore, several parts of the Nut/OS kernel assume memory pointers being 2 bytes only in size. Thus, the kernel may simply ignore the third byte of the ATmega2560/1 program counter.
Not all new interrupts of the ATmega2561 are available through NutRegisterIrqHandler() and some of the ATmega128 compatible ones may be broken. However, you can always use ICCAVR native interrupt routines. See the ICCAVR Online Manual for further information.
The EEPROM read/write routines seem to be broken. As a temporary fix you should use pre-defined IP configurations within your application.
Step 1: Installing Downloaded Software On The PC
All three software packages come packed in executable installers. Install AVR Studio first, the ImageCraft Compiler next and finally Nut/OS.
The Nut/OS installation adds an entry to your Windows start menu named Ethernut x.y.z Configurator, which directly carries us to the next step.
Step 2: Configuring and Building Nut/OS
Nut/OS can be used with different compilers, target CPUs and network options. Thus, extensive configuration is offered. Unfortunately ImageCraft's demo package does not allow to use the compiler without the IDE, but exactly this is required to build the Nut/OS libraries for a specific configuration. If you are running the demo version, ignore this limitation for now and configure Nut/OS. Instead of building new libraries, you can use the precompiled ones in a later step.
Selecting Programs/Ethernut/Configurator from your Windows start menu will execute the Nut/OS Configurator.
A file selection dialog will be displayed first. Choose the right configuration file for your board:
- ethernut103.conf for ancient Ethernuts with ATmega103 CPU
- ethernut13f.conf for Ethernut 1.3 Rev-F or earlier
- ethernut13g.conf for Ethernut 1.3 Rev-G or later
- ethernut20a.conf for Ethernut 2.0
- ethernut21b.conf for Ethernut 2.1 Rev-B or later
- ethernut21b-256.conf for Ethernut 2.1 with ATmega2561 CPU
You can find the version number and revision code on the back side of the board, printed in copper.

When using the Configurator with ImageCraft for the first time, select the compiler from the components tree first, then save the configuration and reload the saved configuration file again.
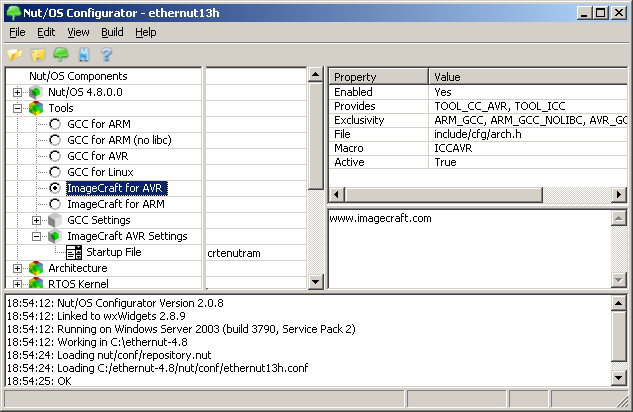
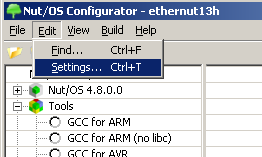
After starting with the updated configuration file, select Edit -> Settings from the main menu. Or simply press Ctrl+T.
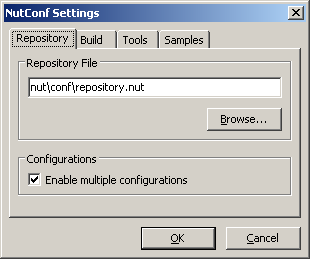
Usually the first page (Repository) can be left unchanged. If working with different Ethernut boards, you may Enable multiple configurations.
Now click on the Build Tab to select the second page. The most important setting on this page is the Platform.
- avrext-icc with ATmega256 equipped boards and ICCAVR v6
- avr-icc for all other boards and ICCAVR v6
- avrext-icc7 with ATmega256 equipped boards and ICCAVR v7
- avr-icc7 for all other boards and ICCAVR v7
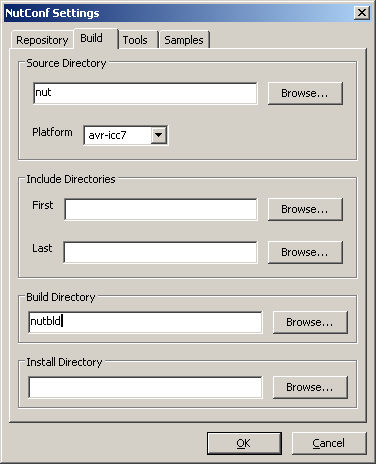
Note, that Nut/OS makes a clear distinction between the source directory and the build directory. The source directory will always contain the originally downloaded source files and all configuration changes will go in a newly created build directory. This allows to create different system builds from a single source.
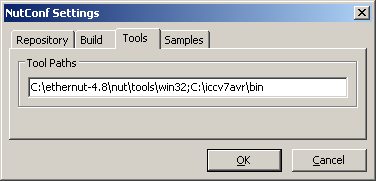
Next click on the Tools Tab to select the third page. Enter the paths to the directories containing the required tools, separated by semicolons. The Nut/OS tools should be first, followed by the ImageCraft bin directory.
Let's move to the last page by clicking on the Samples tab. Allthough possible, it is not recommended to create Nut/OS applications in the source directory or the build directory. Thus, we choose a specific directory to contain our application code. We will later use the Configurator to create a number of sample projects in the specified directory.
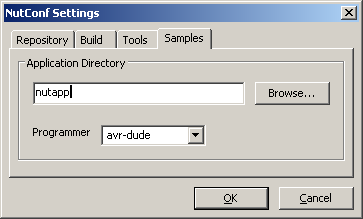
With the ImageCraft Compiler we will typically use the programming dialog of the IDE and need not to specify any programmer here. However, avr-dude is a good choice in case we will use the command line tools later.
Press OK to save your entries. This brings us back to the Configurator's main window. However, if any error message appears
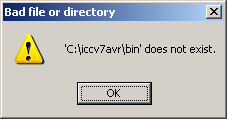
then check your settings again and make sure that you entered the correct paths. Otherwise we are done with the configuration and will now let the Configurator build the Nut/OS libraries.
This step will not work directly with the ImageCraft demo version. As a workaround you may try to add the Configurator to the tools menu of the ImageCraft IDE and start the Configurator from this entry.
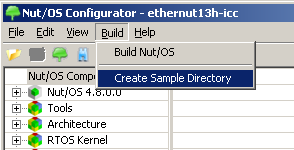
Select Build/Build Nut/OS on the main menu.
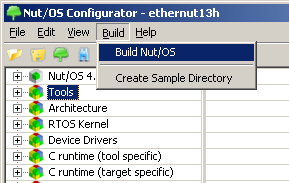
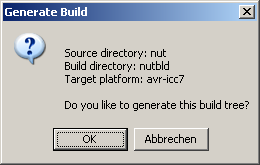
After confirming the message box, the Configurator creates the build directory if it doesn't already exists or alternatively updates an existing one. Actually it creates all required Makefiles and, most important, it also creates some C language header files in the include/cfg subdirectory. These files are included into the Nut/OS source code to tailor the system to a specific hardware.
After this another message box pops up.
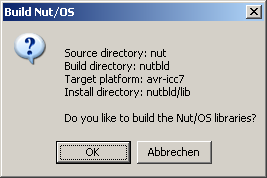
After clicking on the OK button, the Configurator will call the make utility to clean any previous build in the selected build tree and create new Nut/OS libraries in the install directory, previously specified in the settings notebook. The process takes a few minutes during which the Configurator is not accessable.

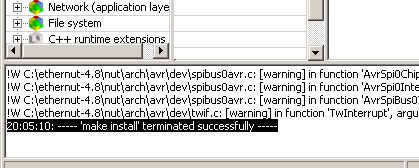
When finished, the result of this step can be viewed at the bottom of the Configurator's main window. Depending on the Nut/OS version in combination with the version of your compiler, several warnings may be listed as well. Usually you can ignore them.
If the build step fails with an error,
check and re-check your settings. If all this doesn't help, you can still use the pre-build libraries mentioned earlier. At the end of this tutorial you will find additional help to solve build problems.
If successful, the build step will have created the following
ImageCraft AVR libraries and object files:
crtenut.o (Startup file for Ethernut 1.3 Rev-G w/o external RAM)
crtenutram.o (Startup file for Ethernut 1.3 Rev-G with external RAM)
crtnut.o (Startup file for all other Ethernuts w/o external RAM)
crtnutram.o (Startup file for all other Ethernuts with external RAM)
crtnutm256.o (Startup file for ATmega2561 based boards with external RAM)
nutinit.o (Nut/OS initialization)
libnutarch.a (Nut/OS architecture dependant routines)
libnutc.a (High level C runtime support)
libnutcpp.a (C++ support library, not used with ImageCraft)
libnutcrt.a (Low level C runtime support)
libnutdev.a (Architecture independant device driver library)
libnutfs.a (File system library)
libnutnet.a (Network library)
libnutos.a (RTOS library)
libnutpro.a (Network protocol library)
libnutgorp.a (Utility library, introduced since Nut/OS 4.8)
Step 3: Loading A Sample Webserver Project
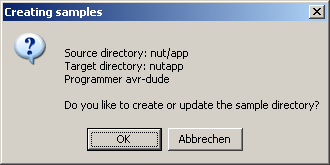
We can now use the Configurator to create an application directory for us and copy some demo projects into this directory. To do this, select Build/Create Sample Directory from the main menu
and verify and confirm the following message box.
Next start the ImageCraft V7 for AVR from the Windows start menu and select Project/Open... from its main menu.
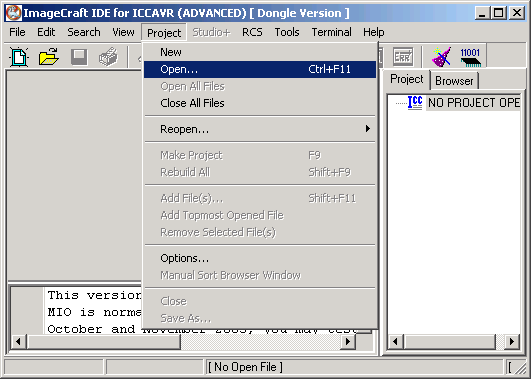
A file selection dialog appears.
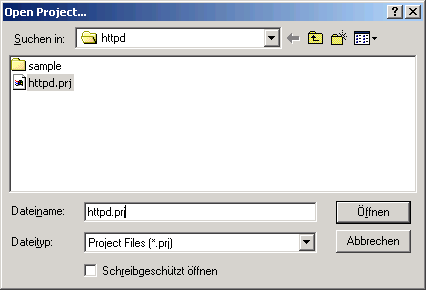
Navigate to the newly created sample directory and open the project file httpd.prj, which is located in the subdirectory httpd.
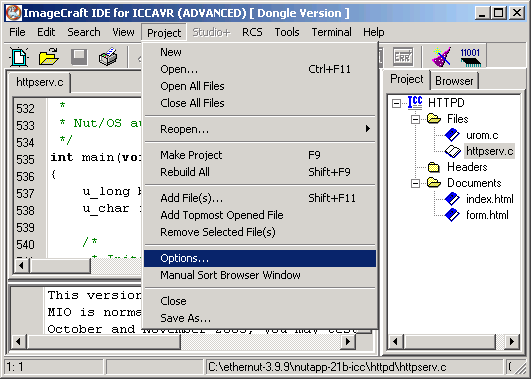
Step 4: Configuring The Webserver Project
The prepared sample projects should contain all required settings. However, when versions change, optional settings may change too and it's always a good idea to browse through the compiler options. Later on you will create your own projects and refer to the following paragraphs to configure it.
If the project files in your Nut/OS distribution had been created for a different version of the ImageCraft compiler, you will see a warning message, reminding you to select the correct target. You can ignore this for now, we will get to this step anyway.
Select Project/Options... from the main menu.
The Compiler Options Dialog will appear. Click on the tab named Paths.
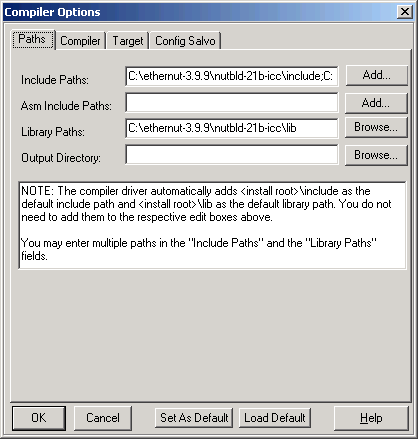
Two additional include paths are required. The first one must point to a subdirectory named include within the build directory, while the second one points to the subdirectory with the same name, but located in the original source directory.
With this setting, the compiler will first search the build tree for a required header file. If it's not there, it will go on searching the source tree. If this fails again, it will try the ImageCraft default include path. This way, header files in the build tree will override header files in the source tree, which in turn may override standard header files of the compiler.
We should also verify the location of the library path, which must point to the install path we specified in the Nut/OS Configurator Settings. If you failed to build new libraries, then change the Library Path to point to the prebuild libraries in the source path. In our specific sample that would be c:\ethernut-x.y.z\nut\lib\icc\enhanced for the ATmega128 or c:\ethernut-x.y.z\nut\lib\icc\mega for those very old boards with the ATmega103 CPU or c:\ethernut-x.y.z\nut\lib\icc\m2561 for the ATmega2561.
Now change to the second page by clicking on the Compiler tab.
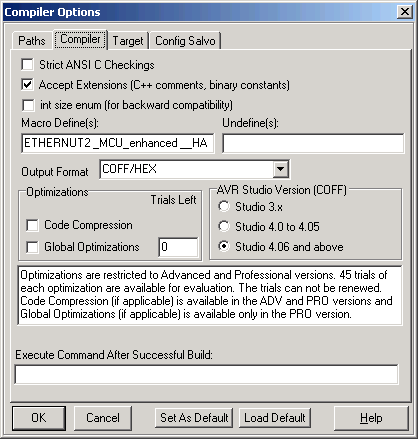
Verify, that all options are correctly set. Code size reduction is optional and only available in the advanced and professional compiler version. In ImageCraft Version V7.15 and later you need to select the option Treat const as __flash for backward compatibility.
Add __MCU_enhanced to the macro definitions only, if you are compiling for the ATmega128 CPU.
Add ETHERNUT2 to the macro definitions only, if you are compiling for the Ethernut 2.0 or 2.1 board.
In any case you need to add __HARVARD_ARCH__.
All Macro Defines should be separated by spaces. If finished, click on the tab named Target to change to the next page.
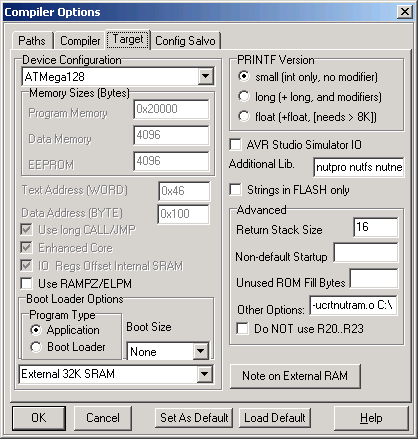
Again make sure, that the right options are set. Specifically check the device for ATmega103 or ATmega128.
The following Additional Libs are required for the webserver project:
nutpro nutfs nutnet nutos nutdev nutcrt nutarch.
For Other Options enter
-ucrtnutram.o C:\ethernut-x.y.z\nutbld-21b-icc\lib\nutinit.o
possibly replacing the path to nutinit.o with your install directory
or the pre-build libraries.
This entry will instruct the compiler to use a Nut/OS specific runtime initialization routine. The main difference to the standard routine is, that NutInit() is called before main(), so any RTOS specific initialization is hidden from your application code. You can simply start coding main(), while the idle thread and the Nut/OS timer is already running in the background. In fact, main() is started as a Nut/OS thread. This feature makes Nut/OS applications look like normal C programs and preserves portability.
Replace -ucrtnutram.o by -ucrtenutram.o (note the additional letter e) for Ethernut 1.3 Rev-G Boards. This special startup file will initialize the Ethernet Controller very early. The 1.3 Rev-G Boards mimic an external EEPROM chip by using some upper address bus lines. If not initialized before accessing external RAM, the Ethernet Controller may interfere and let the application crash.
The last page can be ignored with Nut/OS. Salvo is another RTOS and free evaluation copies are available at www.pumpkininc.com.
Finally press OK to save the configuration and to close the Compiler Option Dialog.
Step 5: Building The File System
Webservers typically handle file requests from webbrowsers. Nut/OS provides a number of file systems to store files. The most simple one is called urom and is used in this sample. It's a read-only file system and implemented by a C language structure array. A tool named crurom is included in the Nut/OS distribution and can be used to created a C source file from an existing directory on your PC.
All you need to do is to create a subdirectory, place all HTML, SSI, Java Classes, image files or whatever in this directory and run crurom to convert this directory to a C source file. This file is typically named urom.c will be compiled and linked together with the other application sources. Of course the available space is limited. The file system, the application code and the Nut/OS libraries have to fit into the internal FLASH memory of the CPU.
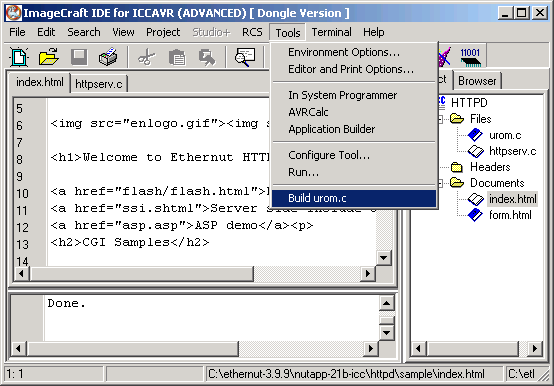
A special entry in the Tools Menu of the ImageCraft IDE will be helpful to perform this step. Select Tools/Configure Tool... from the main menu and add the following entries in the Edit Tool Menu Dialog.
Menu Name can be set to any meaningful name, like Build urom.c.
Program should specify the full path the crurom.exe utility, which normally is located in tools\win32 of the source directory. With our configuration this is c:\ethernut-x.y.z\nut\tools\win32\crurom.exe.
Parameters is used to pass command line options to the tool. With crurom three of them a required. -r instructs crurom to recurse into lower level subdirectories. -ourom.c specifies the output file name, urom.c in this case. Finally the name of the directory to be converted must be given, which is sample here.
Initial Directory is the location where the tool will run, c:\ethernut-x.y.z\nutapp-21b-icc\httpd if you chose to use the same application directory in your Configurator settings.
Finally activate Capture Output, press the Add button and then press OK.
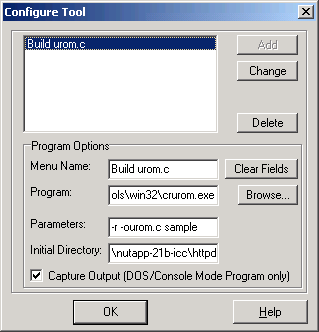
If successful, you can now run the crurom utility from the Tools menu of the ImageCraft IDE each time after changing the web contents.
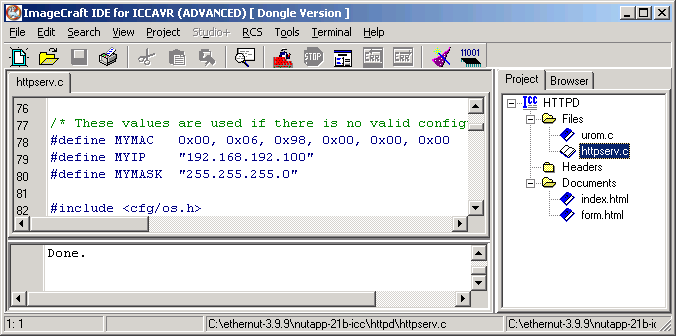
Step 6: Modifying The IP Configuration
By default Nut/OS uses DHCP to automatically setup its TCP/IP configuration. Even without DHCP, typical applications will store these settings in the on-chip EEPROM. In order not to overload this tutorial, we use hardcoded addresses.
Open the file httpserv.c in the integrated editor. Consult your ICCAVR manual on how to do this and how to use the editor. You probably have to change the IP address and may also modify the IP mask to fit your network environment. Otherwise your web browser won't be able to talk to your Ethernut Board later on. If unsure what to do, better ask someone with IP network experience.
It's also a good idea to change the MAC Address to the one, which you received with your Ethernut Board. For self build boards or other boards without MAC address, you have to make sure, that the address is unique in your local network.
Step 7: Building The Application
When selecting Make Project from the project menu, ICCAVR will compile and link the webserver code. Check, that no errors occured during this process. Warnings may be ignored. Refer to the ImageCraft manual for further details.
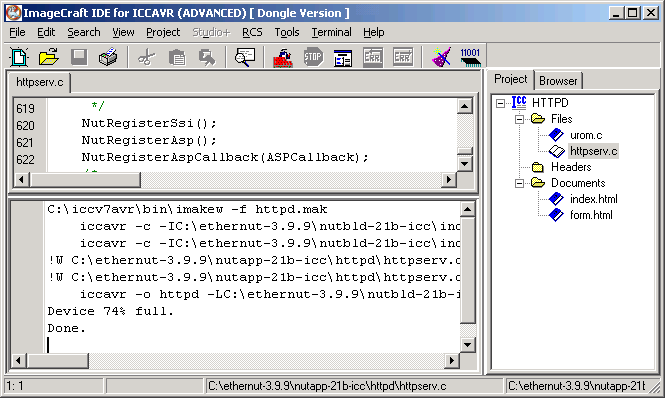
As a result of the this step, the compiler created several files in the project directory. One is named httpserv.hex and contains the binary code in Intel Hex Format. The second file, httpserv.cof, can be loaded into the AVR Studio Debugger and contains the binary code plus additional debug information.
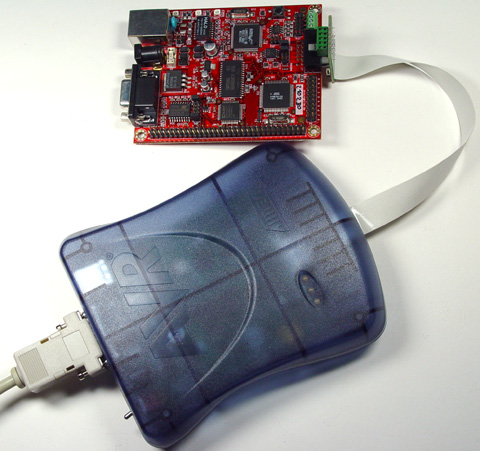
Step 8: Programming The Target Hardware
Now it's time to upload the webserver application to the Ethernut Board. We will first attach the AVR JTAG ICE to Ethernut 2.1 Rev-B...
...or Ethernut 1.3 Rev-G.

When setting up the hardware, several things can go wrong. Please check the hardware manuals that came with your JTAG ICE and the Ethernut Board.
It is important to switch off the power supply before connecting or disconnecting the JTAG cable. Connecting or disconnection the RS232 port or the Ethernet cable does not require to switch off the power supply. These interfaces are quite safe and protected against shortcuts or electrical discharge. But remember, not to touch any bare contacts on the Ethernut board before taking some pre-cautions. For example, dissipate static electricity by touching a grounded metal object.
The serial port of the JTAG ICE must be connected to one of the serial ports of your PC. If you got the newer JTAG ICE mkII, it is recommended to use the USB instead.
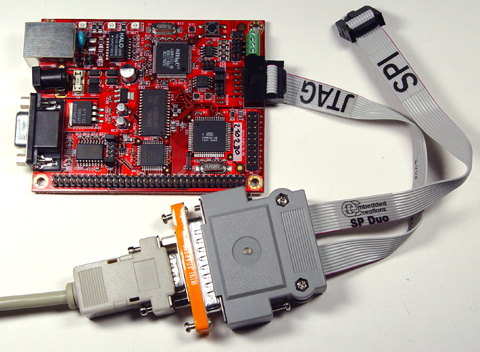
In case you do not own a JTAG ICE, then attach your programmer instead. The SP Duo, which is included in the Ethernut Starter Kit, will be fine too for programming the board. Though, it doesn't provide ICE debugging.
Another serial port on the PC is not really required, but will be helpful. Connect it to the RS232 serial port of the Ethernut Board, using a 1:1 cable.
Connect the RJ45 connector of the Ethernut Board with your local Ethernet Network via an Ethernet switch or HUB, using a standard patch cable. You may also use a cross over cable and connect it directly with the RJ45 socket of your PC.
Finally attach a 12V power supply to your Ethernut Board. The JTAG ICE may either draw its supply from the Ethernut or from the USB.
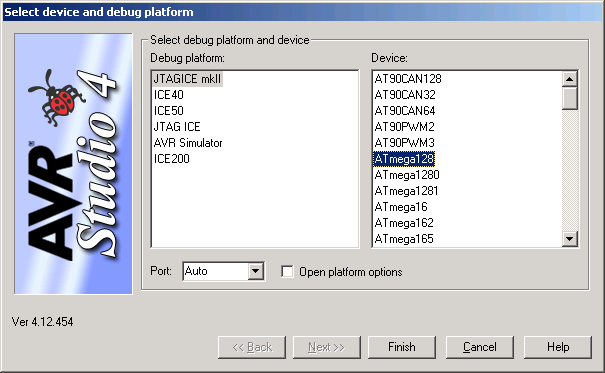
When the hardware has been set up properly, start AVR Studio and select Tools/Program AVR/Connect from its main menu.
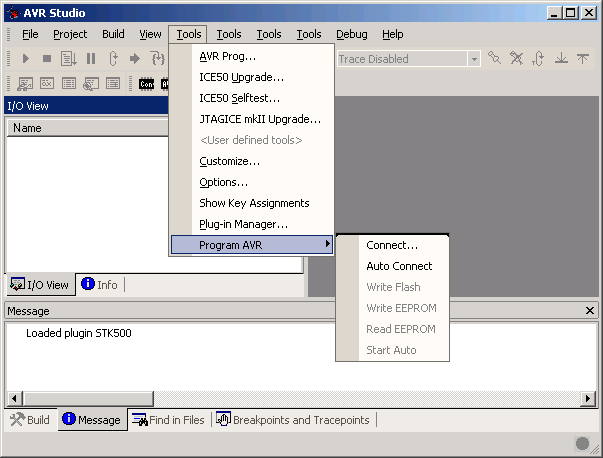
A programmer selection dialog will appear. Choose the programming adapter, either JTAG ICE or JTAG ICE mkII, and the port it's connected too. For the SP Duo select STK500.
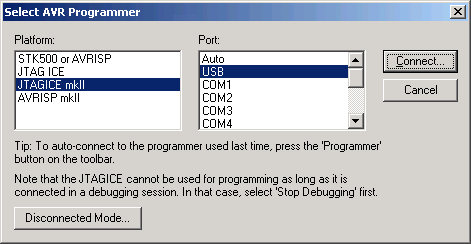
After clicking on the Connect button, the programmer dialog should appear. With the SP Duo a notice will appear, that the firmware of the programmer is out of date. In any case ignore this message when using the SP Duo and press cancel. With the JTAG ICE you may upgrade your firmware, if required. However, not seldom people reported that the JTAG ICE stopped working after the upgrade. Personally I'd prefer not to upgrade the firmware unless you experience problems with the old one.
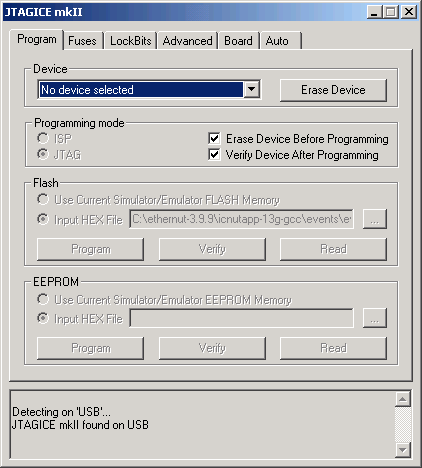
For a first test, select the ATmega128 device

and click on the Advanced tab.
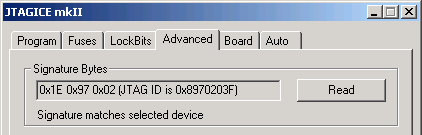
After clicking the Read button, the device signature will be queried from the target board and displayed in the signature field. Additionally the following lines should be displayed at the bottom of the dialog:
Setting device parameters.. OK!
Entering programming mode.. OK!
Reading signature .. 0x1E, 0x97, 0x02 .. OK!
Leaving programming mode.. OK!
Switch back to the first dialog page by clicking on the Program tab.

In the Flash section of this page click on the browse button, the one with the three dots. This should activate a file selection dialog.
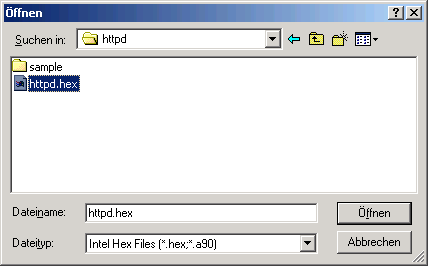
Navigate to our httpd directory within the application directory and open the file named httpd.hex.
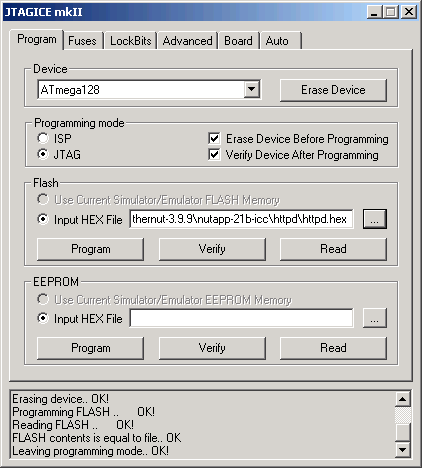
After pressing the Program button in the Flash section, AVR Studio will erase the ATmega FLASH memory, program the contents of the hex file into it and verify the result. This takes some seconds.
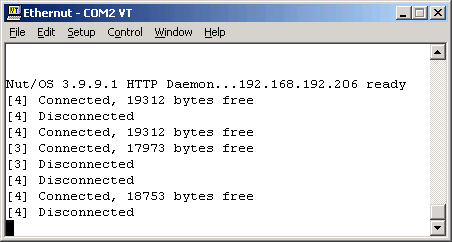
If you connected the Ethernut's RS232 with a serial port of your PC, then start a terminal emulator (TeraTerm or Hyperterminal) to view the output. Configure the emulator to 115200 Baud, 8 data bits, 1 stop bit, no parity and no handshake.
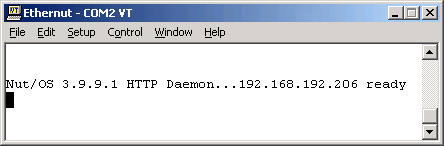
Your output may differ, depending on your Nut/OS version, wether DHCP is available and which IP address had been configured.
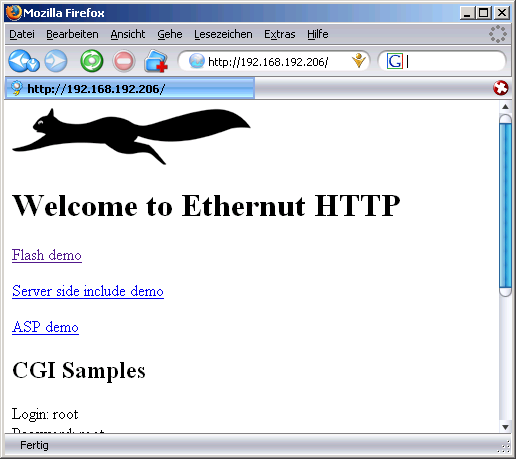
Start a webbrowser and direct it to the IP address of the Ethernut Board. Our embedded webserver should respond with its main index page.
While the webbrowser retrieves the information, Ethernut will produce additional output on its RS232 line.
So far we used the simple programming tool provided by AVR Studio to get our application running on the target hardware. The next step will show how to use AVR Studio for debugging. Close the programming dialog to get back to the main window of AVR Studio.
Step 9: Debugging With JTAG ICE
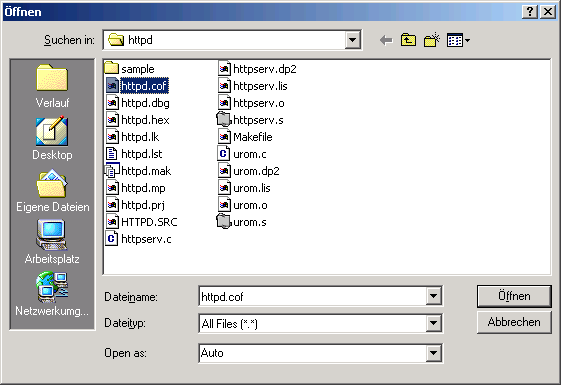
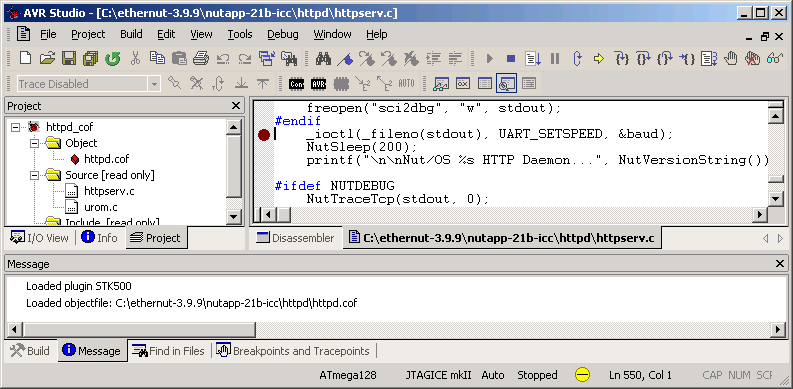
Upto here, the JTAG ICE hardware wasn't actually required. Now it is. Select Open File... from the File menu.
In the file section dialog navigate to the application directory and open httpd.cof, which has been created together with the hex file in a previous step. Remember, that the hex file contains pure binary code, while the coff file contains additional debug information.
AVR Studio insists on creating a project for our debugging session and opens another file selection dialog.
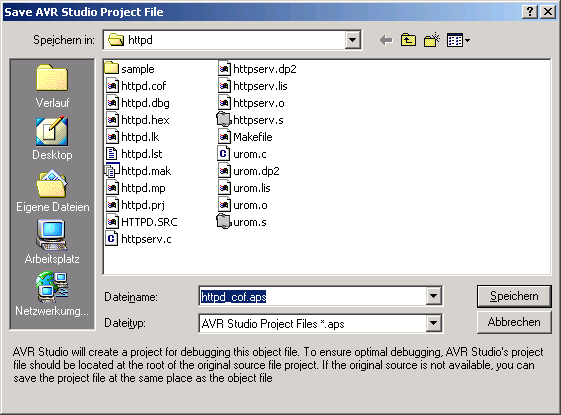
For now we simply confirm the provided default. Next, AVR Studio wants us to select the programming hardware and the device on our target board.
After selecting the correct entries, AVR Studio will finally load the coff file, which takes a few seconds, because the code will be concurrently loaded into the Ethernut FLASH memory. Just to prevent later disappointment: Nut/OS applications will not run in the AVR Studio Simulator. Sometimes even the ICE Debugger gets confused by the weired stack manuplations and needs to be restarted. For the simulator this is too much and it will miserably fail.
After the coff file had been loaded, the target CPU stops at address zero. It is often required to stop the program and reset the debugger by selecting Break and Reset from the debug menu.

The debugger isn't able to find the source code of start up file and displays the instructions in disassembly format. To debug our webserver application, click on the Project tab on the left side and then double click on the httpserv.c source file to open it.
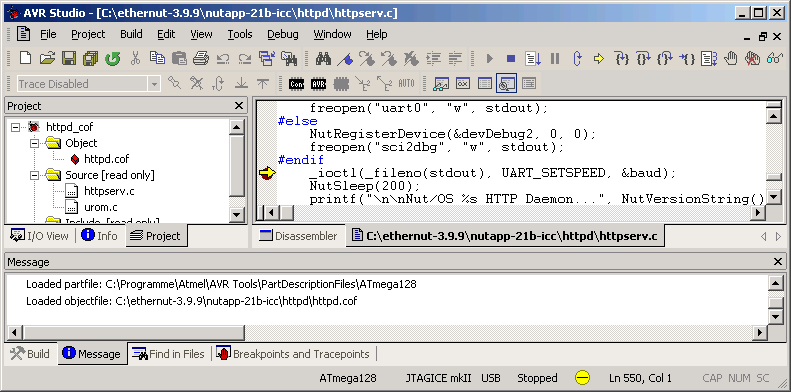
To set a break point, scroll down the source code up to the line, which sets the baudrate by calling _ioctl(). Next click with the right mouse button on this source code line and select Toggle Breakpoint from the pop-up menu. A dark red dot will appear at the left side of the source code line.
Now select Run from the debug menu. This will start the webserver application on the Ethernut Board. As soon as the code reaches the line with the breakpoint, a yellow arrow appears, indicating the next source code line to be executed.
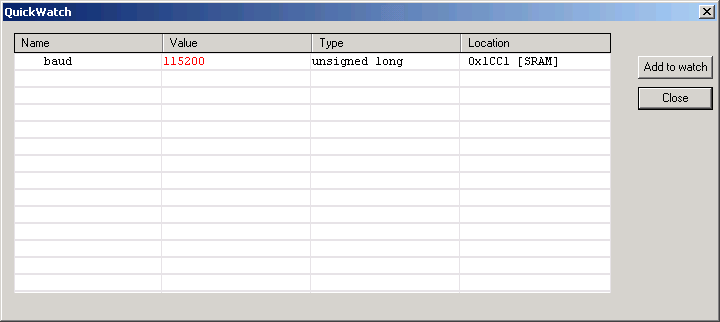
When program execution has stopped, either at a breakpoint or because Break has been selected in the debug menu, you can examine the contents of C variables.
In the source code window click on the variable baud to put the text cursor on it. Select QuickWatch in the debug menu. A window pops up, showing the name, contents, type and RAM location of the selected variable.
For more debugging options check the AVR Studio User's Guide.
Solving Problems
Errors While Building Nut/OS Libraries
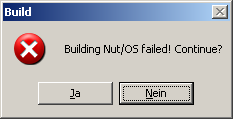
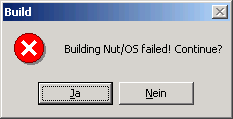
If the Configurator fails to build Nut/OS, the follwoing message box appears:
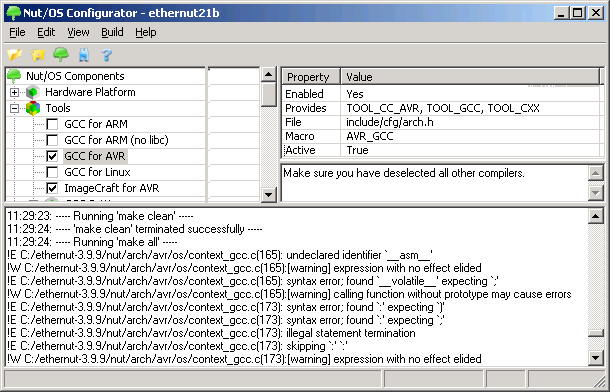
A quite common error is to select the wrong compiler or, as shown in the following screenshot, to have two compilers selected. The current release of the Configurator isn't smart enough to detect such simple misconfigurations.
Also remember, that the correct compiler must have been selected as the Platform in the settings dialog as well.
However, sometimes the build process may fail because either the compiler or the Nut/OS libraries contain one or more bugs. Or both versions may simply not fit after upgrading one of them. The first solution would be to revert back to the previous version. But there are other options, of course.
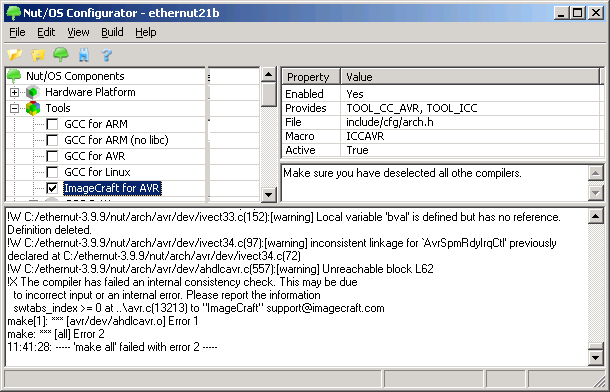
Here's an example of this kind of problems. After upgrading the ImageCraft Compiler, an internal compiler error has been reported.
Luckily the full Nut/OS source code is provided and we may be able create a workaround. On the other hand, this might cost us a lot of time. All we can do is, to exclude parts of the code to locate the source lines which make the compiler fail and, in a second step, try to re-write these lines until the compiler is happy.
When using such a trial and error method, the Configurator isn't the best tool, because every time it starts building all libraries from ground up. Better use the command line.
a) Open a DOS window and change to the build directory
directory.
b) Enter
PATH=c:\ethernut-x.y.z\nut\tools\win32;c:\iccv7avr\bin;%PATH%
on the command line to add the directories containing all required
tools to your PATH environment. Note, that the directories given
above are an example. Your may have installed ImageCraft and Nut/OS
in different directories.
c) Enter
make
on the command line. At the end you should see some kind of error
message. Keep the command line window open and repeat the last
step each time after you modified and saved your changes. The make
utility will re-compile the modified modules only. However, when
changing header files, you need to run
make clean
once. The Nut/OS Makefiles do not handle dependencies.
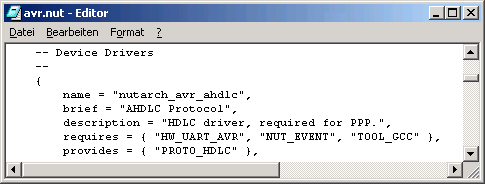
If you are not able or do not want to fix the bug, you may remove the bad module from the build process. In our example, the problem appears in arch/avr/dev/ahdlcavr.c, which is used for PPP communication only. As long as we are not going to use PPP, we won't need the AHDLC driver. If you are familiar with make, the first idea is to remove the related source code file from the Makefile. This will indeed work until you use the Configurator to build the Build Tree again, because this will re-create the Makefiles and your changes will be lost.
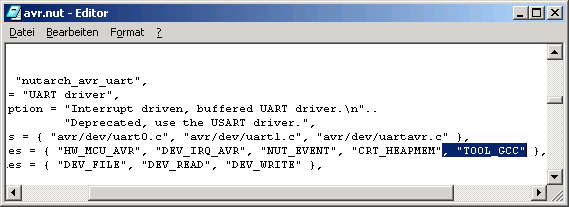
A better way is to modify the Configurator scripts. These files are located in the conf subdirectory within the source tree. Open nut\conf\arch\avr.nut with a text editor and search for ahdlcavr.c.

We may remove the sources line, but if the bug gets fixed later, we need to restore it again. A better solution is to add an additional requirement, which isn't fulfilled in our requirement. Add TOOL_GCC, which tells the Configurator, that this component requires the GNU compiler. It will be disabled for the ImageCraft compiler.
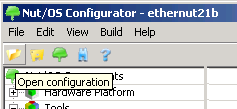
Save the script file, reload the configuration by clicking on the Open configuration button in the Configurator's toolbar and selecting the board's configuration file again.
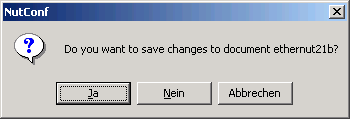
In case we changed any settings in the component tree previously, the following message will pop up. Typically we changed the compiler selection, so let's confirm the change.
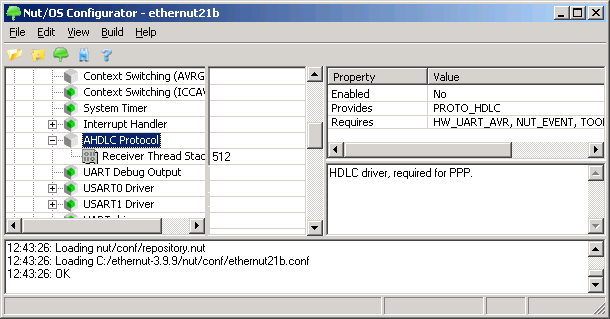
In the component tree open Architecture/AVR and verify, that the AHDLC Protocol Component is now disabled.
Select Build/Build Nut/OS from the main menu. This time the build process may succeed. Or it may fail again at a different location. In our Nut/OS x.y.z preview, the ImageCraft Compiler indeed failed to compile the UART driver arch/avr/uartavr.c. The good news is, that this driver isn't really required either. Most samples use the Debug Output Driver or the newer USART drivers (note the additional letter S),
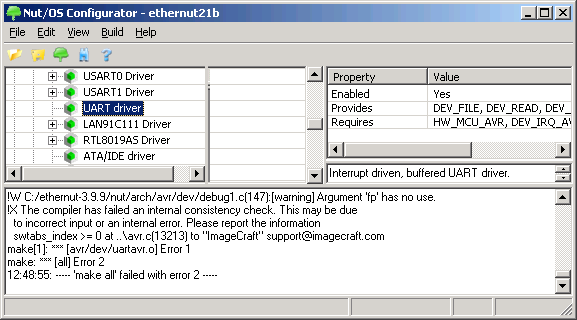
Again we disable this driver for ImageCraft by adding the TOOL_GCC requirement to the AVR/UART component.
Finally the build process runs through without any errors.
Stack Problems
Recently a minor problem had been detected, which may be fatal for your application. If the compiler variables are near the limit of the internal 4 kBytes RAM, they may overlay with the idle thread's stack. Fortunately ICCAVR produces linker results in a map file (extension .mp). It is always a good idea checking this file. It will give you a useful overview about memory usage. Check this file for __bss_end. This is the last RAM address used by your program variables. It should be below 1000 hex for the ATmega128 or 0F00 for the ATmega103. In most cases it helps to move your string literals to flash memory.
Bad HEX files build on the command line
The compiler output naming changed in later releases. You may end up with
httpserv.hex.cof
httpserv.hex.dbg
httpserv.hex.hex
httpserv.hex.lst
httpserv.hex.mp
after building on the command line. As a result, robi will fail to transfer the hex to a binary file used by the bootloader. You can fix this by modifying the file nut/app/Makerules.avr-icc7 (avrext-icc7 in case of the ATmega256). Change
%hex: %o
$(CC) -o $@ $(LDFLAGS) $(OBJS) -lcatmega
to
%hex: %o
$(CC) -o $(basename $@) (LDFLAGS) $(OBJS) -lcatmega
Make sure that tab characters are preserved by your editor. Notepad will work fine.
Configurator build fails
../../nutbld/NutConf.mk:12: *** missing separator. Stop.
In early 2.0 versions of the Configurator changing the options may not have any effect. This is specifically true when switching the canned configuration files from GCC to ICC.
To solve this, load the canned configuration file, e.g. ethernut21b.conf. Change the compiler in the Nut/OS components tree and save the configuration to ethernut21bicc.conf. Then load this configuration file again into the Configurator. You may have to update the settings again.
Hints
Using A Boot Loader
The ImageCraft IDE allows to execute a configurable command after each successful build.
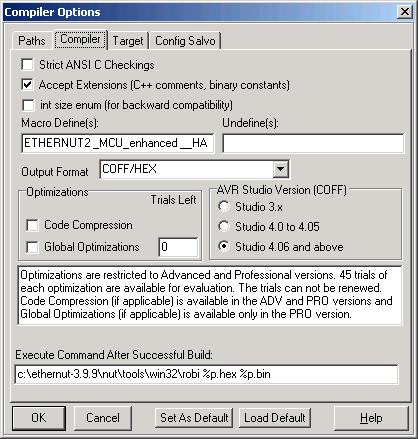
The robi command at the bottom can be used to convert a hex file to a raw binary which can be used to load programs into the Ethernut FLASH via a bootloader. This is much faster than any other method of in-system-programming.
More information about the Ethernet Boot Loader is available here.
Strings In Flash
Never enable the compiler option Strings in FLASH only with Nut/OS applications. In our view, this is a bad compiler option anyway. In Nut/OS you can use the type prog_char instead.